16 August 2013

Sunny Dee: a new shawl pattern available

A little while ago, there was talk in one of my favourite Ravelry groups of the ongoing projects some of us had on the needles that were destined to be gifted to other people. One of the knitters had a whole bunch of things on the go, and said “I wish someone would knit for me!”

Well, I was in the I-need-to-rest kind of place that day, plus I had the sense that there was a new design burbling somewhere in my head that needed to come out. I decided I would be the one to knit for her: I would design and knit a new shawl, and send it off to my knitterly friend.

And, that’s just what I did.

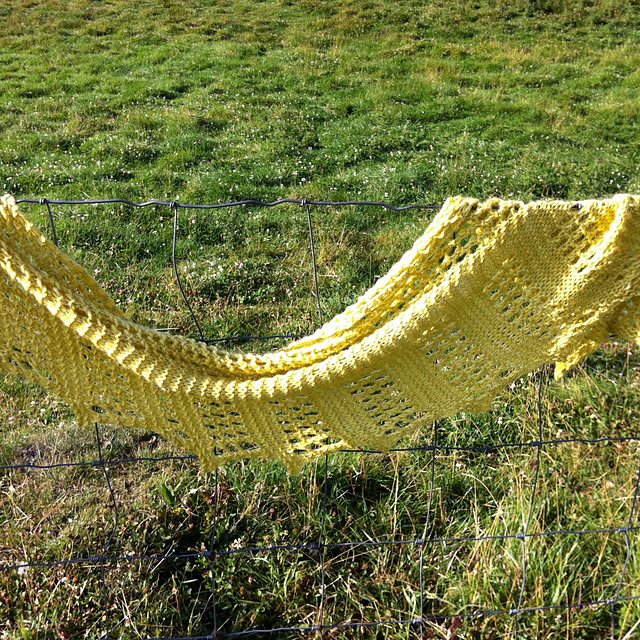
I looked through some pattern books, found a bit of inspiration, and sat down with paper and pencil and needles and yarn and started knitting. I had to restart a few times, as is inevitable when designing, but in the end I came up with a shawl that would knit up quickly in bulky yarn (I finished the prototype that very day), but would also work in finer yarns. As it is a tip-to-tip design, as long as you can divide your pile of yarn in half and the pile is about 200 grams to start with, you’ll end up with something workable.

The shawl is based on garter stitch and the ‘lace’ is just a matter of paired yarn over/knit two together stitches, so it is not complicated at all. The top of the shawl forms a slowly increasing (then decreasing) triangle – you can make it a shallow triangle by working increases/decreases every other right side row, or a more traditionally shaped triangle shawl by working the increases on every right side row. The border is really wide, but a very easy to memorize pattern repeat that forms small points at the bottom edge.

(Yes, those are sheep in the background.)

It’s been made in fine mohair, which creates a beautifully haloed fabric (worn by the knitter’s granddaughter as “her princess cape”), in bulky, super bulky, and worsted weight. All of them look great – hopefully the knitters will add their projects to Ravelry so that you can see them.

The pattern is available now – you can see it on Ravelry or just …

Happy knitting!

15 August 2013

Another week for George, and a new sheep feeder

George the calf has has his two summers and a winter, and it’s time for his ride to the last stop before the Big Pasture in the Sky. However, he was originally scheduled to go last Friday … but there was a snag at the butcher’s and they needed to rebook to this Friday … and then today when we went to hook up the trailer to the borrowed truck, we found that the hitch ball was the wrong size (and very firmly stuck in place). So, we just rebooked for next Friday when the Cruiser will be home, which we know for sure has the right hitch. George can mow the pasture grass for one more week.

So, instead of heading to the butcher I built a sheep feeder. I’d been doing some research on different feeder shapes, again. The one we’ve been using wasn’t bad: it’s essentially a piece of hog panel stapled to the fence posts with a piece of plywood tied to the back on an angle, making a sort of V shaped trough into which the hay is pitched twice a day. The only problem with that set up is that the bigger sheep climb up on the panels and reach over to eat, which is hard on the panels and sometimes pulls the staples out, and the smaller ones stick their heads right through the squares on the panels and occasionally (or frequently, depending how stupid the particular sheep is) get stuck there. Yanking them out several times a day gets old fast (but they STILL put their heads through).

I was also hoping to find something that could hold a little bit more at one shot, so that I can maybe get down to one feeding per day instead of two. I settled on something like the Premier fenceline feeder, as I think the angled base will help the hay settle to where it’s easily accessible, and with higher sides, I can get it pretty full.

I built a small one in the ‘sleeping pen’ today as a test run, and it worked out pretty well. It wasn’t even all that difficult.

Photo 2013-08-15 3 41 05 PM

The Boy assisted by cutting a hog panel in half the long way, with the side with the smaller openings being reserved for the base of the feeder (the other piece is actually attached underneath, to serve as a fence and prevent anyone from escaping under the feeder).

The front and back are made from fence boards screwed into fence posts: the back posts were already there, they were part of the original fence, and the front two posts were added today and not pounded in as deep so that the front of the feeder is high enough that the sheep can’t climb up on it (or jump over it).

Two thicker boards (2x4s, well, I think one is a 2x6, but whatever, it’s the 2 that matters) are screwed to the inside of the posts, the front board higher than the back, and the cut hog panel piece laid on them. Fencing staples are hammered over the wires of the panel to hold it to the boards, and then thinner boards are screwed to the inside of the fence posts going up the front and back of the feeder, creating a big trough. I left gaps between the boards to allow air circulation, save on lumber, and let me see how full the feeder is without having to go outside and peer down into it.

Here is a sheep’s eye view:

Photo 2013-08-15 3 41 25 PM

I can probably lower the whole thing a little bit, most of our sheep are pretty short. I’m also going to cut the hog panel one more ‘square’ up from the bottom on the next one, making the angled base a little bigger in area.

The hay is going to fall through and collect on the ground under the feeder, but the sheep will eat that stuff too – they do quite well eating off the ground, actually, if they don’t end up lying in it. We’ll see how these go – the plans actually call for a tray underneath to catch the hay as it falls through, so that’d be another option (I figured the ground made a perfectly acceptable tray … we’ll see).

This is a small one and won’t hold very much hay at one shot – hopefully if I extend the bases on the long row of feeders I have yet to build, I can widen the whole assembly a little and get a bit more in at one time.

It’s really hot out today, but it was good to get this done. I’ve wanted to have a feeder next to the sleep shelter for some time now, because we can use that area as a catch pen (with a little creative fencing, which is on the list of things to do before winter as well). If you fill that feeder, everyone will run into the pen and then you just slam the gate before they figure out that you are trying to catch them in there. Sheep are very easily bribed with food.

Okay, that’s enough hard work for one day … I’m going to go rest now!
11 August 2013

Frazzlehead’s Handspun Sock Recipe

I spun up three 100 gram Frazzlebatts.
I plyed them together and made two big balls of 3 ply yarn. Sparkly, purple and red and blue yarn. Thick yarn that wanted to be boot socks.
I experimented with needle sizes. I experimented with toe shapes. I experimented with patterns and leg shaping and in the end, I made knee high socks.

Then I thought, I should write that pattern down so that next time I want to make socks out of handspun, I don’t have to do so much experimenting. And I should share it, in case other people want to make socks out of their handspun yarn too – a recipe for figuring out how to make socks with a bit of trial and not too much error.
Quote from the start of the pattern:
So you got a lovely batt and spun it up. Maybe you got two or three. You have this pile of lovely yarn and it really wants to be something awesome, but … what does it want to be?
Perhaps what it wants to be is a pair of socks.
Well, sure, you say, but did I make “sock yarn”? What if my yarn is thicker than the usual stuff you get for socks? What if I’m not sure I have enough for socks? Will I run out partway through the second sock? How do I know how many stitches to cast on when I’m using non-standard yarn?
Fear not, brave knitter, Frazzlehead’s Handspun Sock Recipe addresses all these problems.
It’s free. It’s here. Help yourself! :)

04 August 2013

What does this wrung out jittery feeling *mean*?

I have that wrung out jittery feeling again. It’s a combination of tiredness and restlessness all at once, which makes it terribly confusing to decode. Does this mean I ought to rest, because I’m tired? Or that I ought to go do something physical, like maybe work on that fence that is falling over, to work off the restlessness?

I have no idea. I’m trying so hard to learn how to listen to my body’s messages, but seriously, is this "sit your butt down" or "get a move on, girl"?

Can’t tell.

So, I figured I'd let chance help me out: odds, I work; evens, I rest. And the random.org dice roller says ...

Knitting it is. :)

02 August 2013

Canadian Ecoprinting: leaf print success

We have leaf prints!

AmurCherryOnSilkRinsedWithTea

Those are amur cherry leaves.

CommonNinebarkAndMountainAshOnSilkRinsedWithTea

The really intriguing orangey yellow splotch is from a plant called Common Ninebark, which is one of the rose family (so I figured it might make a neat print – which it did). The parts of the plant I used had little flower blossoms on them, and they made fascinating colours!

Below that you can see a mountain ash (rowan) leaf.

So, technique: I put a bit of water in the sink and dropped in two used (very used) tea bags. I swished that around for a bit, took the tea bags out, and soaked the silk scarf for a few minutes. (Tannins help with mordanting, see.) The silk wasn’t pure white anymore, but it wasn’t very much stained by the tea as it had been very weak.

Then I laid out the damp silk and laid my plant leaves on the silk. I covered each section with watercolour paper, as I had read you could get imprints on the paper as well (which I did, see below). Then I layered plastic bags over the paper (some of which had writing on them, which was a mistake, as I have the words “Amur Cherry” imprinted in a sadly obvious spot on the scarf, I’ll have to cut that off), and folded the scarf into a rectangle. This was then steamed over a pot (cookie cooling rack over pot of boiling water, silk package laid on top of that and covered with an upended bowl) for a little bit, then put into a plastic bag sandwiched between two layers of bath towel and squashed under a heavy crock for three days.

I kept peeking, and when I could see that there were prints showing on the silk, I took it out. Amazing! The prints actually darken a little as the silk dries, and I’ll set them with the iron once it’s had a chance to dry completely.

The marks on the paper were also really interesting:

LeafPrintsOnWatercolourPaper

What I wanted most of all was for the layers of silk to be separated from one another, so that I could see the leaf shapes. This wouldn’t work really well if I rolled it into a sausage, because the layers would all smush into each other, so I thought folding it around a resist made the most sense – and why not use a resist that would make interesting prints on it’s own while I was at it?

I also used the frozen rose petals to make some dye: the dye bath came out brilliantly purple, but the resulting dye on the silk was that colour everyone calls “dusty rose” – a very pale almost tea-like shade with just a hint of pinkness to it. On the positive side, the dyebath and the silk smelled fabulous, a huge improvement over dock, which has a really weird mutant pickle smell to it once it gets wet and soggy.

I took the leftover rose petals from making the dyebath and pressed them between two small pieces of watercolour paper, steamed them briefly, and set them under the crock for a few days too. The paper smells just lovely and has some interesting swirly, watery prints on it. I’m curious to see what it looks like once it dries.

Encouraged by the leaf printing success, I took the rose dyed silk out of its dyebath and layered it with poplar, wild rose, and saskatoon leaves, since those are the plants I have in abundance around here. It’s been folded around plastic resists (no watercolour paper this time, and no ink on the bags) and is being squashed by the crock. I think the two step process should be very interesting – I actually don’t recall if I tea-dunked that one as well, but I think I did.

I also made a dyebath out of some frozen blue flowers, and we did get a lovely blue solution, but the yarn I stuck in it didn’t change colour – though the dyebath did exhaust. Or maybe the colour just faded out of the water, I don’t know. I didn’t have many flowers to start with so perhaps that’s part of the issue.

Anyway, we are making headway with the ecoprinting experiments … I can’t wait to do some more!

There is still room in the workshop at the Pegg Garden on August 25 … more info here!

28 July 2013

Listen to me chattering about fibre

If you would like to listen to me ramble on about the joys of making FrazzleBatts, you can listen to this podcast episode.

For fibre artists, especially spinners, this is a fabulous podcast: if you are in the Master Spinner class from Olds College, you will especially love it as there are a lot of awesome bits of information about the course, as well as other great fibrey tips and tricks.