06 December 2014

Shawl of Sharing

Some time back, a group of fibre artists I belong to banded together to support one of our members who is dealing with cancer.  Of course we did this in the way we know best ... knitting and spinning. I coordinated part of the project, which involved an awful lot of hand spun yarn being shipped to me from all over the world. 
 
The extra yarn has been sitting here waiting for a project ... and just the other day it finally told me what it wants to be.
 
I've been knitting Shawls of Sharing: some are set aside for members of the group that was involved in the larger project, but I decided to post one of them for a wider audience, and share the love a bit further.
 
This shawl is knit from handspun yarn – wool and assorted other fibres (though I don’t believe there is any mohair – there is probably some angora, definitely some silk, and mostly pure wool). It is a slightly curved triangle shape, so it will sit easily on the shoulders, or can be wrapped up tighter like a scarf, or closed at the front with a shawl pin. Colours vary from browns and greens and blues through to a burgundy edging … it’ll go with absolutely anything you choose to wear it with, given all the colours it contains!
 
 
Photo 2014-12-06, 12 07 59 PMPhoto 2014-12-06, 12 09 39 PMPhoto 2014-12-06, 2 24 06 PMPhoto 2014-12-06, 2 24 53 PMPhoto 2014-12-06, 2 25 04 PMPhoto 2014-12-06, 2 24 16 PM
 
Here's how The Shawl of Sharing Project works:
 
If you would like to have this shawl (or have it sent to someone else), perform an act of kindness or make a donation to charity then tell me about what you've done and you'll be entered into the draw. It doesn't have to be anything big: drop some coins into the Salvation Army kettle, make a donation to the food bank, give the mail carrier a cookie, buy a cup of coffee and a muffin for a homeless person, whatever. Small acts of kindness can change the world one little bit at a time … and we aren’t bragging about what we’ve done, we are sharing and inspiring others to find ways to spread a little kindness in the world too.
 
So spread some love in the world, tell us what you have done, and maybe this Shawl of Sharing will come to you!
 
Responses can be made here on the blog, or on Facebook. I’ll draw a name on December 21, to celebrate Solstice and the return of the light!

Medication changes

I've been having more trouble of late. Winter is always harder ... The "yukky stuff" in my past seemed to happen  between thanksgiving and Easter, and that's when my symptoms ramp up. 

I saw my psychiatrist earlier this week, and we are trying a change in meds ... More sertraline, less Prazosin. 

Adjusting to the new doses is a bit of a strain on the body ... I'm spending a lot of time on the couch knitting bulky plain shsls. My brain is foggy and I am so tired ... It should pass in a couple of weeks though. 

In the meantime, I'm working on a project ... More about that shortly. 

Here is a sneak preview:
  

01 December 2014

What dreams may come

The dreaming is exhausting. 

There are things buried in my mind that I'd really rather not see ... And they show up in my sleep, then those visions haunt me through the day. 

I feel betrayed by my own mind. 

17 November 2014

The Cow Buffet is now open for business

Today The Boy and his friend helped me roll the bales from the driveway (where they were delivered yesterday afternoon) into the feeding area.
 
All in place!
That is four rows of two hay and two straw bales in each row, plus I have two more straw bales … one kind of stuffed in at the back (where you can’t see it) and one just under my clothesline, on a tarp, where I can peel it apart and haul some straw up to the barn as needed.
 
The plans for the design we are following are here. Essentially, there is an alleyway just off to the right of the picture that lets the cows and donkey walk up to where the bales are: they have enough room to stand in front of the front row of bales and eat. Right in front of the bales is a strand of electric wire, which keeps them from walking around the sides of the bales and keeps them from messing up the bale too much … they have to reach over or under the zapping wire to get a bite to eat and they will have to clean up what they drop on the ground before I move the wire backwards so they can work on the next part of the bale. It’s a self-serve Cow Buffet!
 
While we were moving the bales in, Sasha stood at the gate demanding that we hurry up. The boys finished putting up the barbed wire around the perimeter and I got the electric wire figured out. I got some neat little adjustable insulator things that fit nicely onto rebar, and we have lots of rebar here. I cut a couple of pieces of rebar to the right length, pounded them in the ground with a hammer, attached the insulators, and strung the wire across in front of the bales. Got it hooked up to the charger and it was zapping away on the first try. If you look closely, you can see the yellow insulators and the two strands of white wire running in front of the bale.
 
Should the rebar get frozen into the ground, I can just put in a new piece ... The insulators can be moved, or I can just use more ... I got a whole bag of them for $4, so I have lots. I will probably also go out and run some wire along the walkway they use to get from the winter pen over to the feeding area: it goes right through one of the pastures, and I don’t really want them walking across the whole pasture all winter … especially come spring, they’ll eat all the new grass before it’s ready, so I need to figure out a way to block that off … and the electric wire should work fine. A few rebar posts, some insulators, some wire, an arch over the gate to get to the charging thing .. yeah, that should work.
 
I still need to get the string off most of the bales, I only did the front row, but for today, this is good! I’d also like to put a big tarp over the back rows of bales, to keep them in better shape over the winter. Need to pick one up, though – we don’t have one here that’s big enough.
 
Once we opened up the gate, Sasha came in and had some hay … when she got bitten by the electric wire she walked away in a huff, but she came back to eat some more so I'd say we have a successful strategy going! Of course we will have to see how it plays out over the full season but I am very happy to not be out feeding by hand every day. And having animals trained to electric wire is going to be a good thing for summer, too, I think. I'll be able to do some closer grazing management without installing permanent fences. ;)
 
Yay for hay and cow buffets!

14 November 2014

Tanning sheepskins: What I’ve learned

Tanning the sheepskins has been a great adventure – I have spent countless hours reading information on the web (one of my favourite links is here) and experimenting with the three pelts I have here, and I’ve come to some conclusions about how I’ll likely do this in the future … because I definitely intend to do this again! I love the process and the finished product.

First, here’s why I bother:

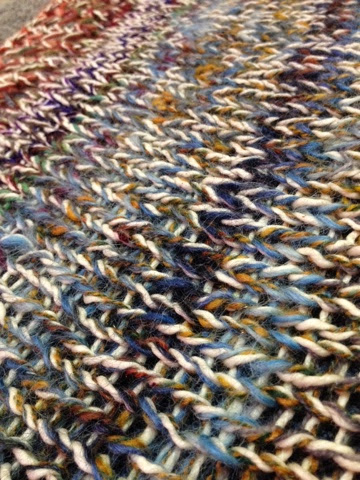
Purebred Icelandic, gorgeous colouring (the ‘shading to red’ like that is not uncommon in Icelandic sheep – it’s called phaeomelanin - and it is even more lovely in real life!) … I’ll be warm under this lovely covering tonight!

So, here’s the process I intend to follow the next time I do this:

1. Get the skins from the butcher (my butchers did a FANTASTIC job fleshing the hides, too, big kudos to them) and bring them home. Use the ulu to remove any large bits of nasty stuff on the skin side, but don’t stress about getting all the little bits of membrane – that can be done later. Cut the tail open and remove the bones. If you aren’t going to wash the fleece right away, salt the skin side and leave it to drain. (The stock trailer is a good place to leave a salted hide!)

2. Drape the hide over a chair in the shower stall and wash it from the fleece side very thoroughly with Sunlight soap (this is what we always used to wash sheep for 4H shows, it is cheap, smells good, and does the job). Use the shower on ‘massage’ setting to help drive out the bits of hay and bugs that are inevitably in the fleece – get it as clean as possible at this stage of the game so that things go more smoothly later on. You are using a whole lot of soap, so this should be inhibiting bacterial action – one of the worries when dealing with a fresh hide.

3. Put the hide into an acid bath. The stuff I used this time worked fine – sulfamic acid, a product meant for cleaning/etching concrete driveways – just dissolve that (or any strong acid, you need a pH of about 2) in water, add a generous amount of salt, stir it all in then immerse the hides and leave them there for a few days.

4. Remove the hides from the acid bath (wear gloves!) and take them back to the shower. Wash again with Sunlight soap: this will help neutralize the acid, and give you a chance to get the rest of the yukkies out of the fleece. Let it drip dry for a bit.

5. Plunk the skin fleece side down on a few towels/sheets laid on the floor and work with the ulu again to really clean the skin side of the hide. Get as much of the membrane off as you can, and work the hide with the knife quite firmly – this helps to stretch it somewhat. Use dental floss to sew up any holes now, while the hide is still pliable. Make sure you insert the needle fairly far from the edge of the hole, or it’ll just tear through the skin.

6. Blow dry the fleece side of the hide to get the drying process underway. This is probably optional: if the weather is good, outside on the line or fence would work well, or just draped over a chair with a fan. Be careful about draping over chair backs for any length of time though, it can stretch the hide in weird ways. Blow drying is a good way to check the fleece over for bits of dirt or remaining bugs – you can get a lot of the nasty stuff out of the fleece while you are working.

7. As the hide is drying, stretch  the skin side to side and up and down with your hands, step on it and tug, pull it across the back of a chair, and periodically put it back on the floor and take the ulu to it some more. The scraping motion of the ulu will help to stretch out the hide as well as getting the guck off the skin side.

8. When the skin side is just damp (and feels chilly) rub some oil into the hide side (mink oil or whatever is handy) and leave to dry some more.

9. Work with the ulu and your hands, stretching the hide, until it is white and smooth and completely dry. It should not feel cold at all – cold spots are still damp.

10. Trim the hide to the shape you want, removing any of the thick spots along the edge (I scrape from the centre out to the edge so a ‘ridge’ of stuff seems to collect along the edges).  Brush the fleece side if you want, or leave the lock structure intact.

Voila! A tanned hide.

I did do one hide (the last one pictured above) with just Murphy’s Oil Soap instead of the acid bath, and it came out fine – though it will need to be smoked still to remain soft. I think the acid bath gave a nicer skin texture, though, so I’ll probably just use that method in the future – it was easy enough.

In hindsight, I probably spent too long fleshing the hides early in the process – they were very clean to start with, but of course I had no idea what “clean” meant, as I’ve never done this before. I dinged the hide in several places, being new to the use of an ulu. I also didn’t wash the fleeces thoroughly until after the acid bath, and the one I did with Murphy’s soap wasn’t washed much at all before I started the process. 

Also, if I have a hide that is really nasty or needs a lot of fleshing or washing, I’ll probably take it to the car wash and use the pressure washer on it. Or, if I ever happen to end up owning a pressure washer, well, then I can just do it here. There are some awesome videos on YouTube of people fleshing deer hides with a pressure washer – it goes *so fast*! I’d use it on the fleece side of a Down breed sheep, too, no problem – not something like Icelandic, which felts if you look at it funny, but something less feltable? You bet. It’d be so clean so fast!

I’ve spent several full days working on these … which was a good thing, given the state of my brain at the time, but the next ones I do I think can be finished in much less time, now that I know what I’m doing.

Overall, I’m really happy with the results. If you try this, or have used other tanning methods, I’d love to hear from you – I really do read the comments!

And if you’d be interested in buying one for yourself … I could probably be talked into doing one or two for sale.

And I think I’m gonna try a cow hide, if I can get a nice one from the butcher. This is just way too cool!

07 November 2014

Tanning Sheepskins

With the last of the sheep turned into sausage (except Cherub, who is still here waiting for a lift to her new home), I’ve been working on the sheepskins that the butcher saved for me.

I went to Sangudo Meats last Friday to pick up the hides, which had been expertly removed (and these folks do an excellent job processing meat and making sausage, too, as well as having great respect for the animals and treating them gently). Came home and hosed off the hides outside, and did an initial pass with the ulu to flesh the hide (though honestly they didn’t need a lot of work, sheepskin is fairly thin, and the initial skinning was done so well that there was very little to remove). Salted the hides and left them in the stock trailer overnight, where they would be safe from critters and cool (it’s cold at night here, but much warmer than usual for this time of year – so the stock trailer is like a big walk-in-fridge, rather than a deep freeze), and the drippy water could just run onto the rubber coated floor.

The next day, the two Icelandic hides got a second pass with the ulu then went into an acid bath: I filled the green turtle pool with water and a container of sulfamic acid, as well as a generous amount of salt, and let them soak for a few days. I weighted them down with rocks so that they stayed submerged, put the lid on the pool and weighted it with a sledgehammer so none of the critters might get into it accidentally, and ignored it. This step is called pickling.

The third hide, a crossbred Columbia/Hampshire/Icelandic lamb, was left well salted for several days, then brushed clean and brought inside for a more thorough fleshing. It was still quite moist, so I just worked it more thoroughly with the ulu and removed more of the thin membrane from the skin side, as well as scraping off the salt residue. I used dental floss to sew up the few holes I made (I’m a rookie, holes were inevitable) and then used Murphy’s Oil Soap to “brain tan” the hide: brains are the traditional substance, but soap and oil, eggs and oil, or a number of other things can be used – you do have to smoke it afterwards, to transmogrify the oils into the proper preservative and keep the hide soft, a step you don’t necessarily need with other tanning methods. As I’m experimenting to see what works well given the tools and materials I have on hand, I’m trying a few different methods. At least Murphys smells all right!

The soaped hide was then left to dry … the skin side is just now beginning to dry out after three days. I brushed the fleece out last night, a job that took a couple of hours with a dog brush … the staple length on this fleece is amazing and is so soft! Here you can see the before brushing and after brushing comparison:

Just look how cushy soft it is to stand on! It’s ankle deep!

Brushing got out the vast majority of the vegetable matter (and the odd bug), as well as cleaning out the dirt and dust. I think if I were to do this again, I’d bring the raw fresh hide in the house right off the bat and give it a very thorough washing with Sunlight soap (what we always used to wash live sheep before 4H shows, and which I still prefer for washing raw fleece) before starting the fleshing process – that way the fleece could be drying while the hide is salting out, and more of the gunk will be out from the get-go.

The hide side is starting to dry now, so I’m working it to keep it soft. This entails pulling and stretching as well as pressing a rounded bone into the skin to provide more stretch. The dogs helpfully brought me a perfect bone from somewhere: they found a nice cow femur that has a perfect ball on the end, nicely aged and slightly roughened so it also works like a pumice to help rub off the leftover bits of membrane. Because the fleece is so cushiony and soft (and clean now) I have the skin just lying on the couch and I scrub the bone into it, stretching into the skin and working it. Traditionally you tie the hide in a stretching frame then press into it with a rounded stick, but this seems to be working, there’s enough flex with the cushioning under the hide to allow for the pressure to stretch the hide when I push on it.

Photo 2014-11-07, 2 25 54 PM

See how the hide is turning white in the dry places? That’s what we want.

The Icelandic hides came out of the acid bath yesterday and were thoroughly rinsed and washed with soap – this will neutralize the acid as well as clean the fleece. The white fleece, Lambie’s, is just gorgeous: I spent a long time with the shower head on ‘massage’ setting washing the VM and dirt out because I want to leave the lock structure intact. It’s drying nicely (I draped it over a chair and blew a fan across it for several hours after the shower treatment), and this morning I oiled it with canola oil and will begin the breaking process as the skin starts to dry out.

Jellybean’s pelt, the black Icelandic, did get brushed as it was harder to work the locks clean for some reason. It’s hard to get a good picture of a black pelt indoors, but here you go!

The skin side of this one was treated with mink oil, and is hanging up to dry. These two should need only breaking, not smoking.

My brain isn’t working very well just now – it’s been a stressful couple of weeks at our house, as The Reluctant Farmer’s work contract was suddenly terminated and he has scrambled to find new work … he has just started a new position as a firefighter/EMT in an industrial department, and things are going well there so we’re all able to breathe a bit easier now but it takes a lot out of a person going through so much change. Working on the hides has been a good ‘mindless’ task. My arms and hands are pretty sore, but I just keep putting Voltaren on them and carrying on with the work!

Hopefully my brain is restored in the next few days. If you’ve been waiting to hear from me on anything, I do apologize … I’m just not really “all here” right now, so give me a few days then try again!

UPDATE: What I’ve learned, and images of the finished sheepskins … here!

27 October 2014

Winter prep

More winter prep today: The Reluctant Farmer built a landing (with a nice railing and stairs and everything) outside the south wing door - which we will now be able to use in the winter. The south entrance has an airlock (interior doors that keep the cold air from rushing in) so it's better to use that door than the north one, which enters straight into the main hallway. 

The old temporary deck that was outside that door had started to rot, so it got pulled up and the weary bits cut up for firewood and the salvageable stuff set aside. 

Today I restacked the firewood, some still needs longer to dry so it went at the back, some was too long (we got free wood last year and some wasn't cut to the size we need) so that got chopped up with the saw and restacked. The logs still awaiting splitting are in a pile, and things are looking better over there. 

Earlier this week I cleared out the hallway so that when we change doors everything is where we need it. 

Progress is happening! Which is good, because it snowed a bit yesterday ... Time is running out. 

15 October 2014

Yes, I’m here.

I haven’t written much lately … I’ve been quite busy, doing one thing or another, recovering from a cold, struggling to sleep, catching up on sleep, working, all sorts of things.

So I’ll just jump in with a bit of a generic update.

The past couple of days I’ve done a bunch of outside work, because Winter is Coming. There’s almost always snow before Halloween, so I have to get a move on if I want to get these things finished before I have to pull everyone in off pasture! With fewer animals, though, we are able to still have everybody out grazing, which is awesome. Some years I’ve had to start on hay by now, to spare the pasture from overgrazing. We’ve still got lots of grass, so that’s wonderful.

I’ve been making bigger changes, as the remaining four sheep are going to be gone by the end of the month: Cherub, The Boy’s 4H lamb (who is now 7!) will be going to a friend’s house for her retirement, and the remaining three will be turned into sausage. Two are Icelandic, Lambie and Jellybean, and I plan to get their hides back and make sheepskin rugs from them … I know for ‘city folk’ that may seem awful, but they are simply gorgeous pelts and I want to be able to fondly remember them and keep my toes warm at the same time. And we love the sausage our butcher makes, so it is a good way to honour the gift of their lives.

Since we won’t need a separate sheep area this winter, then, I removed some fences from the winter pen, making one larger area. I used the nice tall fence  wire to fully enclose the barnyard, removed one gate (which I will need at the Self Serve Cow Buffet), and built the alleyway entrance to the aforementioned Cow Buffet. My Farm Helper will have to come put in the rest of the posts for that feeding area, but it’s almost ready to go, which is good - then I can have my hay delivered and roll the bales in. (We are doing this, if you are curious what I mean by Cow Buffet.)

CowBuffetPlan

Basically, we will be able to have the bales dropped in the driveway, roll them into the feeding area by hand (they are easy to roll when they first come off the truck, it’s just impossible once they freeze in place!), remove all the bale string, and run electric wire in front of the front row. The cows eat the bales, then we move the wire backwards when they have cleaned up what they have dropped. No more pitching hay into a feeder, no more trying to get bales up the hill in the winter, just a self-serve Cow Buffet. The space we are using for feeding is what used to be my garden – the quack grass is unconquerable with the energy and resources I have, so this is a better use for the space. Besides, come spring, the area will be trampled down and matted with manure and hay and straw … and I can feed a few pumpkins and zucchini to the animals in there, then close the gate. This spring I fed Sasha a pumpkin in the barnyard, and we got two pumpkin plants in the spot where she’d left some seeds! I can put a few potatoes in as well, because potatoes will grow quite happily in a pile of straw, so I can at least have a few things growing in the nicely fertilized and cow-and-donkey-weeded space.

And donkeys really DO eat thistles! I watched Miss May purposely munching down on thistles in the pasture yesterday, which is just FANTASTIC.

I also tightened a couple of weak/broken spots in the fences, so that I can be sure the winter pen is reasonably snug (come spring everyone wants OUT ON THE GRASS and they will push if the fences are weak). I have also thought some more about my winter watering plans, though I haven’t done anything with that yet, I’m pretty worn out from all the work I did so far!

I took Miss May for a walk down the gravel road today – she did pretty well, stopping a few times to make sure ewerything was safe, and even though a truck came down the other end of the road, everything went well (my neighbours are very good about slowing down around stock!). We both can use the exercise, and it’s good training for both of us as well. I can see that training a donkey will be very good for me: donkeys need a lot of time to ponder things, to be absolutely sure everything is safe before they proceed. They freeze when they aren’t convinced of their safety … a response I completely understand. It’s my job to be empathetic and encouraging, to show Miss May that whatever she is seeing is safe: For instance, she didn’t’ want to walk through the narrow gate by the water trough for some reason. It looked unstable, perhaps, or too skinny. So I tied her to the post and let her look at it for awhile, I walked through several times, and tried to coax her through, and let her stand by the post when she said she wasn’t ready yet. Eventually she decided it was all right and came through. The next day when I took her through, she didn’t even pause. Donkeys have great memories!

I’ve been reading a lot on donkey training – and I measured Miss May again today to confirm her size and weight: she is 48” at the withers (12 hands) and about 700 lbs, which means I can ride her! Only with a very light saddle, and only after we get some solid ground work under our belts, but it is a possibility!

So I spent the day researching, looking at saddles and tack and learning about ground driving and surcingles and lunge lines and bitless bridles.

It’s all very exciting.

Oh, and when we got back from our walk, I put Miss May in the pasture with all the other animals. Everyone was totally calm about it, having been able to get to know one another through the fence for the past couple of days. Then when I went back outside later in the day and called her, Miss May came running right up to me! Yay!

She is such a great animal. She likes to stand there and have me scratch her chin and hug her neck. I’m so happy she came to live here!

11 October 2014

Meet Miss May

Photo 2014-10-11, 5 45 47 PM
More pictures tomorrow - we got home as the sun went down.

This is Ellie May, my new donkey. :) I think I will be calling her Miss May - we have a cat named Ellie and it just seems confusing.

Miss May was NOT happy about loading into the trailer, though she is quite people-friendly and unloading and getting her into the barnyard wasn't too difficult. She is rather jumpy with all the stress and changes, but tomorrow we begin ground work.

My dream is to have her trained to pull a cart, and go to the corner store (a 15 minute drive by car, so that's a whole day adventure) for ice cream. :)

I am very happy.

She lived with a friend of mine who raises goats, and tended to play too hard with the baby goats. As all our animals are bigger (the last four sheep will be departing - that was the bargain I had to make with DH to acquire the donkey) she will have buddies that are a better size for her - cows and calves. I gave her a couple of sets of interchangeable needles, she gave me a donkey. My cow now has a buddy for when she has no calf around (which will be for a few months most years) and I have an equine friend.

Miss May is a full sized donkey - about the same height as Sasha, though lighter and not as long in the body.

Cherub, The Boy’s much loved 4H lamb, will be retiring to a friend’s farm, and the other three will be turned into sausage … and I plan to make a couple of sheepskin rugs from the fleeces, I think I’ll really enjoy having those here, and the process doesn’t look too daunting.

Sheep are just too hard to keep inside the fences – donkeys and cows stay behind barbed wire, and can feed themselves at a self-serve buffet … more on that in the near future, construction is underway.

Time to go grab a bite to eat – more tomorrow!

ETA Here are more pictures!

She stood nicely for brushing, let me pick up her feet, and came to me wherever I stood in the barnyard. She is very curious about everything – perfect attribute for a donkey! She wonders about things, stops, thinks, and then decides what she feels about it all. Training her is going to be really fun!

18 September 2014

Catching up

Been pretty quiet around the blog lately, but not because I don’t feel like writing – I’ve just been really quite busy!

My parents came to visit, and we had a fantastic time. We went to Fort Edmonton, where some of our family heirlooms have been donated – ate brunch in the dining room at the Selkirk Hotel, next to the buffet and hutch that were in the room for most of the holiday meals of my life, and saw the painting my great grandmother did hanging right behind the front desk at the hotel … that’s incredible! It’s so awesome to have it there where everyone can see and enjoy it.

Photo 2014-08-23, 12 53 51 PM

We also did a day run out to Jasper, and went on the new Glacier Skywalk – wow, what a view!

_IGP0160

Family selfie:

IMAG0188

And Dad and I conquered the glacier:

DSCF7883

Had supper at the Jasper Park Lodge on our way back … oh my, it was fantastic! And we had this for dessert!

It was just awesome to hang out with my parents. Mom even came to the felting workshop I did, and mended the Boy’s quilt with a fantastic Apple Jack Creek themed applique!

Photo 2014-08-24, 11 06 32 AM

That was all really awesome.

Then The Reluctant Farmer and the Small People and I went to visit my in-laws, which was also fantastic. They are such lovely people and they live right on the lake, so there is always fishing! They are selling the lake cabin (too much to manage now), so this was probably our “last trip to the lake”.

Then more work to catch up on, then apples!

Which became juice (and some more that’s fermenting into cider):

And then more work, and then trying hard to get rested up because having done that much, my chemistry is all dialed up to eleven. Oi.

So, I have some audio books, some printed books, some knitting, and … I changed my hair colour.

Photo 2014-09-18, 1 40 45 PM

I love the henna red, I truly do, but it is simply more than I can maintain now. My real hair colour used to be very blonde, then gradually darkened to a sort of dull ash blonde, with plenty of silver strands in it. I like the silver – it’s like the sparkle in Frazzlebatts! – but the contrast between my own colour and the bright red was just too much. Having had henna in my hair for what, ten years or so, it was deeply, thoroughly embedded, especially in the tips. Getting it out was a bit of a challenge, but thanks to information found on the web and some careful experimentation, I was able to lighten and counteract most of the remaining red, and then just brightened everything else. Now as my hair grows, I can easily lighten the roots a little if I want to (it’s just peroxide, which is very easy to apply and does a fine job on my hair - since I don’t use heat or other products on it the rest of the time, it doesn’t do too much damage … nothing I can’t counteract with the usual oil, aloe, and flax treatments I use normally, anyway). As the silver gets more pronounced, it’ll just all … become sparkly. And in the meantime I won’t look like I just stopped taking care of myself!

That’s the hope, anyway.

Photo 2014-09-18, 1 58 36 PMPhoto 2014-09-18, 1 59 43 PM

It’s a bit startling to see myself blonde again … my hair hasn’t been this colour since I was quite a lot younger than I am now!

So there you are, you’re now caught up on the happenings at Apple Jack Creek. Time for me to go grab a glass of apple peach juice from the fridge and some lunch!

ETA: I really was blonde as a child. Even lighter than this, actually:

Lonna and Dawn and Cunningham house sign

10 September 2014

Kitchen Day

It snowed here day before yesterday. Like, three cm on the ground snowed. Snowed more yesterday. It's almost all melted now, but it's still chilly. 

So I decided today is a good day to do kitchen stuff. I baked apple spice cake, chocolate banana bread, lasagne, cannelloni, and a pot of beef soup that I will be delivering to a friend. 

Also sorted the jam jars on the shelves, found what I have and what I need, what I should be using up faster, and some stuff to go to the chickens. 

Now I'm sitting down while the dishwasher does round two (and there'll be a round three yet); but there are snacks in the freezer for lunches, and some easy things to defrost for dinner on days I have less energy. 

Voila. :)

24 August 2014

Felting Workshop

Today I taught a felting workshop at the Pegg Garden … it was a load of fun!

Photo 2014-08-24, 2 03 30 PM

These lovely artists created felted vases … so many different colours!

Photo 2014-08-24, 2 03 46 PM

I did a quick intro, then worked on a demo vase while everyone had lunch … it was like dinner theatre but with soap and water and wool. (Mine’s the one on the far right with the thistle on it.) Everyone started their creations after seeing how it was done, and we had a lot of fun seeing everyone’s felting take shape. It starts out as this weird lump of soggy wool, and ends up as a shaped vase that stands up on it’s own!

Photo 2014-08-24, 2 04 08 PM

Look, this one is shaped like a pitcher.

My parents are here visiting from Ontario, and my mom came to the workshop with me today, which was really awesome. She arranged all the sample vases with flowers and greenery … the County Horticuluralist, Lorraine (on the right) cut the greens and Mom (on the left) did all the arrangements.

Photo 2014-08-24, 11 06 32 AM

Look how pretty they are!

Photo 2014-08-24, 10 59 15 AM

It was really fun.

When I came home, Dad and The Boy had been cutting deadwood out back – more firewood for winter, and less of a mess in the back!

Photo 2014-08-24, 4 14 29 PM

Look at all that!

Photo 2014-08-24, 5 35 09 PMPhoto 2014-08-24, 5 35 28 PM


What a lovely day.