Showing posts with label garden. Show all posts

29 March 2016

Permaculture - inspired landscape design: dirt

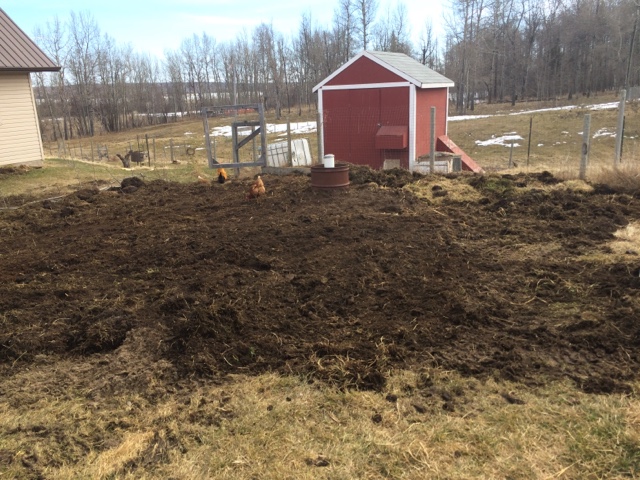
Today things finally had thawed enough to get the skidsteer going. 

The giant windrow of composted barnyard stuff is somewhat mixed... There are bits that are just slimy hay, bits that are gorgeous compost, and bits that are what amounts to quack grass sod. 

This means that what you end up with is kinda lumpy. 


However, I managed without breaking anything - not even a fence post. (This is actually quite an accomplishment for me, the skidsteer is persnickety and I'm far from an expert.)

Once I had lots of piles of dirt in place, I got the rake and started moving it around. Big chunks got tossed over by the chicken coop fence, where I hope to grow some squash and sunflowers so the lumpiness won't matter. Lots of the partially decomposed stuff went by the retaining wall, where there will be lots of things planted that will appreciate it and help it break down the rest of the way. 
The smoothest stuff went in the barrel around the well head - it'll get planted with flowers so it looks like a container, and as a side benefit, the well head itself is much more protected. 

It was a lot of work but I'm very pleased. 


Yes, I let the chickens out to scratch in the fresh dirt. They seemed appreciative. 


There's more raking to be done, but what's there needs to settle and thaw the rest of the way. I have another big pile to spread out, and more loads to bring out to other low spots around the house, but that was a good day's work. 

Oh - I scraped off a bit of "sod" and took a picture of what our soil looks like :


Clay. Just... Clay. 

This is why I'm not a vegetarian anymore - there's no way our particular patch of land could grow much beyond pasture grasses... But it grows those well. And then the animals turn the quack grass into this stuff:


Which grows lots of things. :)


21 February 2016

Sprouting!

I have been saving the seeds from all the apples and pears I've been enjoying from our Organic Box and keeping them in a damp container in the fridge. 

Today when I went to add a handful of pear seeds, there were sprouts!

I planted the little things in one of the new pots I placed on the south deck: it's still cool and fluctuating in temperature outside so they should be happy. It's a little warmer up on the deck, and sheltered from wind, so... We shall see!

Free trees. How awesome. 


22 December 2015

Epic Crash... But yay Solstice!

Yesterday I crashed... In a truly epic fashion. I won't even describe it, but... Ugh. Awful. 

Let's not do that again. 

But today?

Today is Solstice. 

The Light returns. 

Spring will come. 

And in the meantime I shall drink tea, hug Ben, thank my family, and plan my garden. 

Nothing brings hope like planning a garden. 

Even the simple act of scooping the seeds out of a winter squash and saving them to plant along the fence line is a tiny act of hopeful rebellion against the dark.

I'm saving my apple seeds, too. 

Ha. 

Take that, Darkness!

09 May 2015

More Yard Updates: trees!

image title
I transplanted a bunch of little pine trees from the back where they were clustered too close together to grow up well anyway (I found a couple of clusters of little evergreens when I was out for a walk with my neighbour today) … so I thinned them out and brought them up to make a wind break by the west edge of the yard.

image title
Raspberry bushes and a gooseberry bush, also wild, from the back.

image title
Couple more trees, by the fountain & wildflower-bed-to-be. :)

28 February 2014

Windowfarm 3.0

I’ve made several attempts at growing plants in my window.

Without a pump, the original version didn’t work very well. With small gutter containers, the second version worked fine for starting the seedlings, but then I couldn’t keep up with their water requirements, and they all died from dehydration.

Enter Windowfarm Version 3.0: Kratky Hydroponics.

How does this work? It’s a completely passive, set-it-and-forget-it system. No pump. No bubbler. No electrical stuff at all, totally silent, just sits there in the window and takes care of itself. It’s awesome.

I tried this out last summer with a couple of tomato plants I got at the grocery store garden centre (the day they were closing it down and giving plants away for free, no less). I planted several outside in the raised bed planter stairs, and they did all right … but late in the season when frosts were heading in, I uprooted one that had a lot of green tomatoes on it and stuck it in a Kratky bucket on the window sill … and it kept growing! And the tomatoes ripened! It was amazing and cool.

So what’s this Kratky bucket? It’s a big pail (I am using small ones because I’m just starting plants – a tomato or cucumber needs a very big bucket if it’s to live there all season, but I believe you can grow a lettuce to maturity in about 4 litres of nutrient solution). The bucket needs to be dark, so that algae don’t grow in the nutrient, and the plant sits in a net pot (a plastic plant pot with big holes in the base to let the roots come through) that is suspended in a hole in the lid of the bucket. I use a hole saw to drill a circle in the bucket lid, set the net pot inside the hole, then fill the net pot with some hydroton (expanded clay pellets made for growing plants, they look like cocoa puffs) and nestle the plant in the middle. The plant drinks the nutrient solution, which is right up to the level of the plant’s roots to start out with, and as the nutrient level drops, the plant grows roots to reach down to where the water is … and because there is air in the space between the bottom of the net pot and the surface of the nutrient solution, the plant doesn’t drown and the roots stay oxygenated.  There are a lot of great YouTube videos showing different gardening set ups using this system, if you want to learn more.

Now, because I live where the growing season is very short, I need to get my plants started ahead of time. And, if I can manage it, I’d like to grow some smaller things, like lettuce, over the winter. I don’t have a grow light set up (yet), but I do have a very bright, very sunny south facing window, and I have put my plants up there. So far, they aren’t looking terribly leggy or anything and they seem to be doing quite well!

I start the seedlings in rockwool cubes that I found on sale at the hardware store last year. Once they are well established, I tuck the rockwool cube with the little seedling in it into a net pot of hydroton and put that into a bucket of nutrient solution. I usually keep the bucket down where I can check on it for a few days to make sure the plant is doing well and hasn’t gotten dried out or waterlogged, then I put it up on the window ledge to soak up sunshine and grow. That’s all there is to it.

Photo 2-17-2014, 1 18 36 PMPhoto 2-17-2014, 1 19 02 PM

There you see a couple of cucumber plants and four tomatoes, happily soaking up winter sunshine.

I do realize that these plants won’t be able to live in these buckets all their lives – they are going to be too large, and they’d drink up all the nutrient solution in a hurry. Once the weather perks up, I’ll be transplanting them outside. I may leave some plants in straight up hydroponics buckets (probably smaller plants like lettuce, which will be okay in my smaller buckets), but the larger plants will be going into soil. I’ll be setting up some sub-irrigated planters outside, probably some large raised beds made from scrap wood or pallets, then lined with a waterproof liner, and fitted with a reservoir in the base (flexible weeping tile). More on that adventure when we get there … but you can see an example of what I intend to build here. Growing straight in the ground is a losing battle against quackgrass, so I am changing gears and putting my energy into building some planters that will be lower maintenance and still give me great yields.

I’m hopeful, anyway.

So hopeful that I started new seedlings today … some beans, some lettuce, some peppers.

I love growing things.

13 March 2013

Windowfarm, Version 2.0


We've upgraded to Version 3.0... find out more here!
So, remember the Windowfarm I started last year?
Well, it had some issues. Keeping the water flowing was just not happening without a pump, and I don’t want to have to listen to a pump going every so often … I hate mechanical noises.
So I did some more reading, and found out more about passive hydroculture – basically, growing plants in liquid. Now, if you just put plants in water the roots will drown, they do need air. This is where hydroton comes in: those expanded clay pellets hold water and make it available to the plants, but they also hold air, so the roots don’t get waterlogged. Basically, you put a bare-rooted plant in a dish of hydroton pellets, water it (with liquid fertilizer so it has nutrients to grow), and that’s it. No flushing, pumping, or anything.
I’ve got a couple of house plants that have successfully survived in hydroculture for over six months now, so I figured maybe I’ve got the hang of this.
I started my seedlings in rockwool cubes: handy little bricks of finely packed threads of something that works like hydroton but is smaller. Soak them, put the seed in the hole, label the cube (a cut up yogourt container makes nice little tabs that slide easily between the rock wool and the plastic wrapper for the cube) and set the cubes in a turkey roaster with a plastic domed lid. The turkey roaster sits on top of my gas stove, where the heat from the pilot lights keeps the whole thing nice and warm, encouraging the seedlings to sprout. The lid keeps the moisture in, and I just pour a bit of water in the bottom of the pan every so often to make sure the cubes don’t dry out.
When the seeds sprout, I take the cube over to the windowfarm, which is still mounted in the south facing window. For those just joining in, the windowfarm consists of plastic eavestroughing with the ends capped, suspended from that metal shelf support stuff with the holes in it (which you would normally hook a little shelf arm into, but for this purpose, a loop of metal from a set of old window blinds is wired through the holes, it’s nice and strong and holds the weight of the full trough just fine). The rockwool cube with it’s new seedling gets nestled into the hydroton that fills the trough, and the trough is then watered generously.
Photo 2013-03-13 11 36 56 AM
I do have drain holes in the ends of my troughs (from the previous attempt at an ebb and flow kind of set up) but I just hook the tubing up over the edge and clip it in place so that the water doesn’t drain out.
The window faces directly south and gets a lot of bright light. I’ve been keeping the drapes closed, which traps the plants between the glass and the curtains, and the light bouncing off the light beige curtains seems to be helping the plants to stand mostly upright, rather than leaning drunkenly towards the glass like they usually do. It would be ideal to have a little fan blowing on these seedlings to help them get stronger, but I haven’t got anything suitable (I’m keeping an eye out for a solar powered fan that might work in this application).
Photo 2013-03-13 11 36 39 AM
As you can see, the tomato plants are quite happy in this location. Today they got their first drink of hydroponic-nutrient-enhanced water … up until now they’ve just been watered with plain, out of the tap stuff, but they are big enough I figure they would benefit from some extra nutrition.
So far, so good. We’ll see how they hold up as they get bigger … I am going to attempt a few pepper plants, I think – they won’t make it outside in our climate (or not very well anyway), ‘cause they  like more heat than we get, so I think perhaps the window will be warm enough to get some good pepper growth. Worth a shot, anyway!

17 April 2012

A garden out of dead trees

Today I started an outside project: a garden out of dead trees, my son called it (to which The Reluctant Farmer said, “Well, that kind at least guarantees success…”).

It is,  of course, not a garden of dead trees. It is a garden *fence* made of dead trees. I will have to do some major repairs to the fence around the main garden that I did last year with poplar branches, but I haven’t gotten to that yet. Today I put in a few stakes below the front window and made a very low fence to contain a raised bed. The stakes provide upright supports for a few smaller branches (and some leftover stems of something that might have been sunflowers, I’m not sure, I found a pile of useful stuff beside the garden but it’s no longer recongizable). The small branches get woven in and out of the upright supports, making a bit of a fence – just enough to hold back the pile of dirt that will go inside.

I got one load of dirt in, but that was enough work for me for one day.

Now it’s time to knit: I’m working on the shawl for the Mary Maxim design competition – I should have something to show you tomorrow.

17 January 2012

Grow garlic on your windowsill without dirt

We've upgraded to Version 3.0... find out more here!
When I set up my hydroponic WindowFarm, I bought a great big bag of something called Hydroton. It looks like fifty litres of Chocolate Covered Sugar Bombs, but really they are clay marbles, more or less, manufactured with a special process that makes them hold water and nutrients but still allow plants got get lots of air.
You see, plants drink lots of water and nutrients through their roots, but the roots also need to be exposed to air or the plant will suffocate and die. This mix of water and air is essential to plant health. Hydroton neatly solves this problem – and, it solves one of my problems, too. This stuff is easy to pick up if you spill some on the floor, unlike potting soil. (I’m a bit clumsy, so this is a bigger advantage than you might expect.)
Thanks to the kind and wonderful Ev, I have a little bag of garlic that I intended to plant in the fall, but didn’t manage to get in the ground before the snow came. When I stood there, staring at this giant bag of hydroton and wondering what I could possibly plant in it that would grow right now, I remembered I had garlic. Wonder if it would grow in this stuff?
So, I filled a pickle jar with hydroton, stuck a clove of garlic in there, green tip up, and put more hydroton around it to hold it upright. Poured in water about halfway up the side of the garlic and waited.
Look what happened in just a few days!
DSCF8437
See those roots, reaching into the spaces between the clay marbles? Cool, eh?
I should technically have this covered up so that algae doesn’t grow in the water, but it’s too much fun to watch the roots do their thing. I’ll probably get organized and make a jar cover (which would be prettier anyway) at some point, but there’s no algae yet. I can probably speed the growth by adding some of the hydroponic nutrients (liquid fertilizer) but for now I’m waiting to see what water alone will do. Between evaporation and the garlic drinking the water, I’ve had to top it up a couple of times already, but the  nice thing about hydroton is that it buffers the plant from water stress. If I forget and the water level gets low, the plant has some reserves of water stashed in the clay and can get to that until I clue in. When I do top it up, I just fill the jar until I’ve covered all but the top part of the root system – I want it to be able to breathe, so it doesn’t get filled right to the top.
I do have another pot in a different window that uses a wick: this is what people usually call a ‘self watering pot’, which is, of course, a misnomer as they don’t walk themselves to the tap every time they need a drink. A wick pot is really simple: just take your average pot-with-holes-in-the-bottom and tear a strip or two of rags from something, probably cotton or something else that gets good and soggy when wet, about half the height of your pot plus a couple of inches. Stuff the wick through the hole in the bottom leaving an inch or two dangling out (if it’s a big pot use two or three wicks) and then put in a bit of not-dirt (perlite/vermiculite/peat moss mix, the soilless mix you can get in bags at the store).
(Yeah, I spill this stuff every time. Get a broom, you’ll probably need it too.)
Pull the wicks up a little bit so that they reach at least halfway into the pot, then fill the pot the rest of the way with your soilless mix and add your plant (garlic works great!). Now set your pot on an inverted canning jar ring (or some other device to raise it up a bit while allowing the wicks to dangle through) in the bottom of a bowl. I have a few cereal bowls with chipped edges, so I’ve repurposed them as pot saucers for my wick pots, which are just regular garden centre plastic pots, nothing special, but the bowl improves the overall appearance quite a bit.
Pour water into the bowl so that it just comes to the bottom of your pot (but doesn’t soak it, you don’t want it always sitting in water). Now, thanks to the wonder of capillary action, water will move up the wick and into the soil at just the right pace for the plant. The perlite/vermiculite in the mix help keep the soil aerated and the peat moss helps the moisture move throughout the whole pot (hydroton is great for holding moisture, but doesn’t wick it up from the pot very well, so you can’t use it for this kind of thing). All you have to do is put water in the bowl whenever it gets dry, and not soak your plant, although the first time you water the plant you should also water from the top to make sure all the soil has been dampened, that helps kick start things.
Technically, both of these processes fall under the category of passive hydroponics. If you live in a cold climate, have nowhere to garden, love growing things but hate spilling dirt on your floor … maybe give this a try. It’s pretty easy.
Plus, how could anyone not be thrilled to be growing garlic in January when it’s –40 outside?

05 January 2012

Windowfarms: grow food all year

We've upgraded to Version 3.0... find out more here!

There are some really cool ideas for growing food indoors at the Windowfarms website. The basic idea is to take a series of pots (frequently built from pop bottles or other repurposed containers) and suspend them, one above the other, in a window, then use a drip irrigation system to run hydroponic nutrient fluid through the pots to feed the plants. Voila: your downtown apartment now has a garden in the window!

This is indeed a very cool idea. I have a really (really) big front window that is just begging to have some plants in it: it faces south, gets full sun all day, and is behind the couch so if there were plants there they wouldn’t be in anybody’s way and would add some nice visual interest to the room. Plus, I love growing things. And I love eating fresh salad. And I have the gardening bug worse than usual this year.
So … I set about designing a windowfarm that would work in our house. First of all, no pop bottles. It needs to be pretty enough to look at regularly and not upset the rest of the household with my weird experiments. The Widowfarms kits are lovely, but pricey, and anyway, I have room for a lot of plants - the window is seven feet wide. I did a lot of research into hydroponics setups and found that a series of troughs set one above the other with each trough on a slight incline is pretty common: you put water in the top and it runs down each channel into the next and ends up in a reservoir at the bottom, kind of like a marble-run.
Aren’t these gorgeous? They are from a company in California, Vertical Earth Gardens.

So, after several nights lying awake and pondering options, I decided to make a trip to the store and see what I could find that would work.
I was going to use PVC piping, like the Vertical Earth Garden, but the first store was out of the size I needed and the next place had the pipe, but didn’t have enough end caps. Then I remembered that some people use vinyl window gutters instead, so I headed to the lumber aisle and found those. Same price as the PVC, even with the end caps – and this way I wouldn’t have to cut any holes and I would be able to easily clean the troughs when the time comes. The nice man cut the 10’ lengths in half for me, so I had enough materials to build four troughs.
I also picked up two metal shelf supports to mount in the space between the window panes: I needed something to hang the troughs on, and though I intended to use the little shelf support things that come with the metal rail, they are too wide for my purposes. I found a different solution, which I will explain below.
Next there is the water: most hydroponics setups use a pump to get the water from the reservoir at the bottom back up to the top to make another run. These are usually put on a timer, and depending on the plants you are growing, how big and thirsty they are, and the type of growing medium you have them sitting in, you run the water through the system anywhere from constantly (as is done in the nutrient film technique) to once or twice a day (as you would with an ebb and flow system). Well, I don’t want a pump going all the time, so NFT is out. Due to the fact that we have a farm and animals, someone is here every day anyhow, so a manual system (perhaps with a pump for backup in case of long absences) is workable … and affordable. So, gravity feed is our starting assumption, and the growing medium needs to be selected to provide reasonable water retention while not drowning the plant roots. I found a hydroponics shop in the city and made a trip there to pick up some Hydroton growing medium: a big bag of clay marbles, basically. They hold water and nutrients while allowing air to get to the roots. I also got some rockwool cubes to start the seedlings in, though I will probably use peat pellets later on. Rockwool is a really good starter medium as it also holds water, air and nutrients really well, but the spaces between the rockwool threads are very tiny, so the little seedlings can get a good start. Once they have roots sticking out of the cubes they can be nestled in among the Hydroton pellets but for starters, the seedlings need a bit more coddling.
Okay, I had my supplies and it was time to start the construction. The troughs had to be put together by attaching the end caps to each end of the gutter and sealing with silicone, and then drains added by drilling a hole in the bottom of one end and fixing a piece of tubing in place with more silicone.

At the upper left of the window is the top reservoir, where the nutrient solution (water with fertilizer in it: for starters I bought stuff from the hydroponics store, but come summer I will brew up my own with compost tea – I am not doing that now, as it would stink up the house to brew it indoors and it’ll freeze outside!). The reservoir is a black plastic jug that held protein powder, suspended on a curtain rod hanger mounted inside the window frame. In the bottom of the jug is the business end of an IV drip set: there are some advantages to living in the same household as an EMT when it comes to drip irrigation systems! Right now the tube is dripping into the bottom plant tray, because the top two trays are empty of plants.

The troughs are supported by loops of metal cut from an old venetian blind wired to the shelf brackets. By adjusting the length of the loops a bit of an angle can be created so that the water will drain down and do the marble-run thing.

Until the seedlings get roots long enough to reach the bottom of the tray I will need to give them a bit of water through the top of each pot. The hydroton will wick some of the water from the tray, but it’s not a very deep stream of water and they may get thirsty without some help. There are only three seedlings so far, so it’s easy enough to help them out.
The other seedlings are in their rockwool cubes in a turkey roasting pan that the Reluctant Farmer got for me at the grocery store, on sale for $1.90, complete with plastic lid! It’s the perfect seedling greenhouse, and because the tray is metal, I can set it on top of my gas stove where the pilot lights give off just a bit of warmth. Once those seedlings are established and have roots sticking out of the cubes, they can be nestled in the trays as well, and then we’ll start the water flowing from the top and doing the full marble-run routine.
The system’s been well flushed now, and I think it’s time to mix up the first batch of nutrient solution and feed those little pea seedlings. Then it’s time to get back to knitting … there’s a book deadline coming up!

30 August 2011

Adaptation

The season is beginning to turn towards fall: the evenings are cooler, the hay is being baled in the fields, and the geese occasionally appear overhead, contemplating the journey south.

The garden didn’t do as well as I had hoped, but the efforts to eliminate the quackgrass have been more successful than I dared to believe. Oh, there’s still lots of the stuff around the edges, but the central planted garden beds are reasonably weed-free.  I now know why people like to plant in rows instead of the intensive square foot method: when you have a large garden and a lot of weeds to deal with, the rows mean you can just walk through the garden, hoe in hand, and scritch up anything that is growing where you didn’t plant anything. Of course, this works better if the dog doesn’t get into the garden and dig a cool spot in the dirt before your seeds get started – thanks to Mackenzie, I have a few plants growing in odd places as the seeds got tossed several feet to one side when he dug up his napping place in the spring. Still, my long-handled half-moon hoe has seen good use since the initial clearing with my mattock. I think next year, I’ll try the same approach: dig up the stubborn roots with the mattock, rake everything smooth, plant in rows, keep the space between the rows cleared with the hoe, and slice out anything too close to the plants with the hori-hori knife.

Next year, I’ll also be planting earlier. In fact, I hope to experiment with some fall seeding under cover: if I clear out some space in one of the beds this fall and put the row cover in place, I should be able to put out some cold-hardly seeds after the winter chill sets in. When spring comes, they’ll ‘sprout when ready’. I had some plants that survived the winter with no cover or anything – some feverfew, onions, and a few other herbs, so if they made it on their own, they might do well with a bit of help.

I’ll also get a bed ready for early spring planting: if Kevin Kossowan can do this in his city back yard, I think it’s worth a try out here too!

In the meantime, I’ll keep checking the corn (we have a few cobs growing out there), the squash (I see some spaghetti squash and what I think are pumpkins … I didn’t mark which thing I planted where and all the squash plants look alike to me), and the tomatoes (there’s a few tiny little tomatoes on the vines, I have no idea if anything will get big enough to use before the frosts come but we can hope).

In fact, I should probably go out there now, wander the rows with the hoe in my hand, and see what I can see.

18 July 2011

My garden is a sermon

As I work in the garden, I am repeatedly struck by the thought that there is a sermon somewhere in the dirt and weeds and vegetables.

17 Do not let your heart envy sinners,
   but always be zealous for the fear of the LORD.
18 There is surely a future hope for you,
   and your hope will not be cut off.

Proverbs 23

Do not let your heart envy sinners – in the garden, I suppose the sinners are the ones with picture-perfect, weed-free gardens bought at the price of industrial agriculture’s cancer-causing chemicals. In truth, I don’t envy those gardeners – they have sold their souls (and our children’s future) for pretty gardens. A few weeds or bugs aren’t the end of the world, and really, we’d all be better off if we spent some time on our knees in the garden, separating the weeds from the vegetables. Yeah, I'll admit that I’d love a garden like the ones at the English castles but really … I’m fortunate to have so much land, and the time to work it. Even if it’s never as pretty as Prince Charlie’s lovely gardens, I’ll still enjoy the potatoes and carrots.

There is surely a future hope for you – yep, gardeners always hope. Next year, we say, next year, the quack grass will be under control, I’ll get the seedlings in a bit earlier under cover, more of the tomato plants will survive. And really, each year has been a little better than the last. Learning to garden in each place takes time and practice – no two garden plots are the same. What worked in my city backyard doesn’t work in my country garden, and it’s taking me awhile to learn what will work out here. That’s okay – I am learning it, and that’s the important thing. Next year will be better. :)

It’s true that my garden isn’t any kind of prize winning space – although, all things considered, it really has come a long way. When I started this spring, the entire plot was filled with runaway quack grass, and now, at the midpoint of our growing season, there are some potatoes, several carrots, a few rows of beets, a few tomato plants and one pepper plant that looks like it might actually make it. There’s a sunflower coming up along the edge, and two morning glories … the grape vines survived the winter and being munched by sheep … the compact cranberry bushes that I thought dead have new leaves and are grateful for the breathing room my regular weeding has provided. Some of the pea plants came up. There are six or eight corn plants growing. The lettuce is nearly big enough to eat, and there are four squash plants of some kind or other (I can’t remember what I planted) that have big leaves, even if there are no blossoms yet. There is hope of a harvest, even if it is smaller than I had dreamed.

The garden is full of lessons. like the lesson of the mulch and the quack grass, which is one I am given to contemplate almost every time I’m out there.

Digging up quack grass roots, I have discovered that the areas where I tried to mulch the stuff into submission with straw and newspaper developed the thickest mats of roots. You can’t cover this stuff up and expect it to go away – the grass just winds it’s way through the mulch, forming new roots as it goes, creating an even more solid mass of weeds that’s twice as much work to remove. In the areas where the stuff was dug out at the beginning and the new shoots were pulled more or less as they appeared, the soil is nearly clear of runners and roots, and keeping it weeded is a much simpler matter. Where it was left to hide under layers of straw, it takes some serious muscle to haul up the tangled mess of roots and nodules, and a day or two of inattention is all it takes for green shoots to reappear in those places.

This lesson, of course, strikes home. A bunch of really unpleasant stuff happened to me, back in my Other Life. I never tried to pretend it hadn’t occurred … I always admitted that these events had happened, that it had hurt, and that it was really a rough time. But once I admitted it, I did only the bare minimum to deal with it: I mulched my troubles, hoping that under the weight of day to day life and the passage of time, the roots of the pain would die out and I’d be left with a clean inner landscape.

Of course, it doesn’t work that way. You need to dig it all out at the start - look at those ugly white roots, shake the dirt off of them and toss them out of your garden so they don’t take root again. If you mulch your troubles, when the green shoots of those old troubles finally poke through, you discover that you have no choice: you have to dig up the whole thing, including the additional mess of roots and tangles that grew while it was all under cover and you weren’t paying attention. It’s way more work than if you’d just taken care of it at the start, but you know, we all do the best we can, and sometimes, a season or two of mulch is the best response we can muster at the time. The mulch didn’t help the actual problem – in fact, the problem got bigger while it was buried – but in the meantime, the garden wasn’t entirely unproductive. Yes, there were a few more weeds in the vegetables than if I’d taken the time to get it all cleared out at the start, but honestly, I didn’t have the time or resources to get it all cleared and a few weeds were the price I had to pay for just getting on with growing things.

By mulching my troubles I was able to get on with life for a few years. In the end, of course, it caught up with me, and I am sad to look back on my life and see how these buried troubles poked their heads up and caused me to behave badly without actually realizing what was going on. At the same time, I know that I did what I had to do to get from one day to the next, and I know that as soon as I realized the extent of the problem, I stopped mulching and started weeding in earnest. Now I’m digging up all the old roots of hurt and pain and fear and anger, knocking the dirt off, and tossing them out of the garden. I’ll always have to watch for those little green shoots, but if I can take the time now to really get things cleared out, then I’ll have a better harvest next year, and the year after that.

There’s always hope.

14 May 2011

Quack grass is not a weed…

… it is a force of nature, in the same category as rivers and wind. It will grow through anything – clay, soil, landscape fabric, your carrots and potatoes. I’m convinced the stuff would grow through concrete given half a chance.

This year is the year that I finally take on the quack grass in the garden. You see, up until last summer, I thought I was dealing with some form of “sod” out there – you know, just grass of one kind or another (or more likely, several kinds mixed together – this is old pasture land after all). The conventional wisdom when gardening over sod is “dig it up, turn it over, put more dirt on top, mulch around it, and it’ll just compost down into the soil and you’ll have a lovely garden in no time!”

This does not apply when the grass in question is quack grass.

Quack grass forms long (and I mean long, we’re talking metres long) roots with nodules on them that run along under the soil and pop up new shoots every so often. You know you are dealing with quack grass when, upon pulling out a sheaf of the stuff, you also get a handful of dirt trailing stringy, tough, long white roots that are a good two millimetres around with periodic little bumps on them. If you see that … give up any ideas you may have had about mulching, turning sod, raised beds, and landscape fabric. You need a whole different strategy.

First of all: you have to clear the space. All of it. You can’t have grass walkways between your beds – that just gives the quack grass a source of nutrition for the roots that will reach from the walkway into your garden bed and crowd out your vegetables. You need to clear the entire garden area and at least a 1 metre border all around – two is better. If you can do this in late fall, that’s great, early spring works too. Start by tilling it all up: rake out any big chunks of roots and nodules and toss them outside the garden, then let the turned earth and roots dry out in the sun and wind for a week or two … then do it again. The idea is to kill off the new plants as they get settled in, cutting them off from their source of energy before they get a chance to feed the roots and start again. Eventually, you’ll have brown dirt with just a few quack grass plants popping up every so often. Pull them out when you see them, or slice them off with a hoe – the objective is to starve the root system by removing any green leaves as soon as they appear. This will be your ongoing job … if you let it take hold, before you know it the entire garden will be overrun and you’ll be back at it again.

Don’t despair if you get a little behind though … I noticed that the areas that had never truly been cleared were far worse to dig out than the areas that were clear last summer, but had gotten over grown by fall. Stay ahead of it as much as you can, knowing that the longer you keep the entire area clear, the more likely you are to truly eradicate the stuff completely.

I’ve given up on raised beds in my garden and am going with raised rows instead: when the weeds come up along the edges of the raised beds, you can’t easily attack them with your weeding tool as the wood of the raised bed gets in the way, so the weeds take root and then you’ve lost that part of the battle. With raised rows, the edges of the rows just gradually fall into the paths between the beds – you can dig weeds out of the paths as well as the beds with the same ease, and walking on the paths compacts them and defines them in contrast to the raised piles of soil that form the beds themselves.

My research tells me that the most important thing with quack grass is to keep that clear perimeter: if you can keep one metre around your garden clear of the stuff, then it won’t poke up between your garden plants, and you can harvest carrots that don’t have stringy quack grass nodules growing through them like some kind of alien tentacle. I’m going to try growing potatoes in the perimeter: since you have to hill up the ground over the potatoes during the growing season, you’re weeding as you do that anyway – and apparently they can outcompete quack grass to some extent anyway. I’m sure I’ll have a few tubers with weird tentacles grown through them, but I can live with that.

So far, I’ve completed most of the tilling: about 800 of the 900 square feet of my garden has been cleared and is presently drying out in the sun and wind. Landscape fabric was the worst mistake I made: it didn’t work, as the roots of the quack grass had just grown right through it, and removing it was hard work as the soil on top was so heavy that lifting the fabric just caused it to tear and hacking through it with the mattock just resulted in tangles of fabric and roots. Ugh. I won’t make that mistake again. When there’s quack grass near your garden, you want a free hand to get down into the dirt and pull the stuff out – landscape fabric and raised bed borders just get in the way.

It does feel good to see so much clear brown dirt out there. With my new arched row covers that The Boy made me for Christmas, I can probably even plant a few cold tolerant things this week!

Once I get the garden cleared and re-fenced, I’m seriously considering housing some geese in a moat around the outer edge. They eat grass shoots, I hear…

06 September 2010

Woad: blue stuff from green stuff

This year, I grew some woad in the garden (seeds from Richters, of course).

Translation for non-fibre artists, and those unfamiliar with Celtic warriors:

Woad is a plant that contains the same blue ‘stuff’ as indigo, which is what your blue jeans are dyed with. Celtic warriors painted their faces blue to scare the enemy (Braveheart, anyone?) and as the indigo plant, which has higher concentrations of the dyestuff in it, won’t grow in colder climates, woad is how blue dyes and paints were made in the northern parts of the world for centuries.  

Yesterday evening, I picked some  of the leaves from the garden… and a good thing, too, as we had a hard frost last night (and woad doesn’t do blue after frost). This morning, I followed the instructions from here and here to extract indigo out of the woad.

The first batch I did turned out … the second didn’t. I heated the second batch differently, but more than that, I think it was that the leaves for batch #2 were harvested this morning … after the aforementioned killer frost. Hmmm.

The successful method worked like this:

  • harvest the woad leaves: in my garden, all kinds of stuff got mingled together so I wasn’t always sure what was woad … if you squish the leaves they bruise to a blue-green colour, so you can confirm what you’re working with
  • leaves sat on the counter overnight, wrapped in a damp tea towel
  • tore the leaves into bits
  • boiled a pot of water and when it was good and bubbling, scooped some into a glass jar which I set in the pot as a double boiler type contraption
  • added a glug of vinegar to the jar of hot water
  • added the leaves, handful by handful, stirring in with a spoon
  • got a bowl of cold water ready in the sink
  • after all the leaves were in and the whole mess heated for about 5 minutes, transferred the jar to the cold water to chill
  • stirred, added ice cubes to the water and replaced with cold water for about 10 minutes until the liquid was noticeably cooler
  • got the soda ready: dissolved a generous scoop of washing soda in hot water, cooled that as well
  • let the leaves sit in the cool water bath for a total of 20 minutes from when they left the hot water
  • strained the leaves out of the cooled mix
  • added soda mix to the leaves: everything went from green to brown!
  • poured from one glass jar to another back and forth until the liquid was very definitely blue
  • poured into 2 jars and let settle
  • 2 hours later, precipitation was obviously happening: blue granules were settling on the bottom

We now have 2 jars with a greenish liquid on top and blue granules on the bottom! Very awesome. I’ll let it sit overnight and then the instructions say to rinse the top liquid (remove and replace with clear water) repeatedly until it is clear on top and blue sludge on the bottom. Then we’ll remove the last of the water and let the powder dry out. I’ll probably try doing that directly in the glass jars.

This was the coolest mix of gardening and chemistry ever. I’m definitely growing more and trying this again next year! Of course, to dye wool or fabric with this requires a whole ‘nother adventure, but wow … I made blue stuff out of green stuff that grew from seeds! Too cool!

25 July 2010

Working in the Garden with God

I usually spend summer Sundays in the garden – the nearest Quaker Meeting is more than an hour away, and as that doesn’t seem like a good use of fuel or time, we are “Isolated Friends” … still Quakers, but not in regular attendance at our nearest Meeting.

So, I listen to God in the garden while I work.

Today’s message was clear:

Genesis 3:19: In the sweat of thy face shalt thou eat bread, till thou return unto the ground; for out of it wast thou taken: for dust thou art, and unto dust shalt thou return.

See, in lots of gardening books, they say “just turn over the sod, and next year, you’ll have a perfect spot to grow your garden”. So that’s what I did. I turned it. It was pretty and brown. Then, before I knew it, I had knee high grass growing where I meant to put plants! I didn’t realize until just this year that it’s not sod that I am working with … it’s ancient pasture grasses, with a thick matting of roots sheltering the rhizome root system of quackgrass.

Now, I readily admit that it’s lovely stuff for the sheep to eat … but this stuff does not go away just because you faithfully turn the soil over. It spreads by the roots – so any little piece of root left in the dirt just becomes another plant. Rototilling is a means of plant distribution – not destruction.

So, I spent the day as no doubt many of my ancestors have done, on my knees in the dirt, digging up invasive roots with a mattock and my gloved hands. Once an area of dirt is mostly cleared of roots, you can grow other things there. You’ll have to keep pulling the quackgrass that makes it through, but eventually, it’ll die off if it hasn’t got any leaves above ground. The runners spread up to a metre though – so you need a good clear boundary around your plants.

Now that I know what I’m dealing with, I’ve got a plan. It involves a lot of digging, mostly.

I did pull out some high-tech tools – I’ve put landscape fabric down in many spots. Some of the fabric is covered with raised beds filled with screened dirt (filtering out the quackgrass rhizomes, so that the plants get a bit of a head start and can hopefully outcompete the grass), and some – particularly the areas along the of the garden (where the grass works it’s way in from the adjoining pasture) are covered with a heavy layer of straw mulch, with a spot of dirt every so often containing a transplanted calendula flower and sprinkled with a few more flower seeds in hopes that something pretty will grow.

So, it was a long day of digging, but it’s the first step towards a truly productive garden. Get the nasty stuff dug out now, and although I’ll always know the sweat on my face when I work in the garden, there’ll be a little less of it – and a lot more harvest.

The garden teaches both consequences and grace: don’t keep up with the weeds, and as a consequence, there’ll be less food to eat … but then, even if the weeds have gotten ahead of you, you can change your ways now and see a better harvest. Grace.

18 July 2010

Sometimes, things just move slowly

This year, lots of things seem to be moving very slowly. The garden is taking ages to get up and running – things don’t want to sprout (except the weeds, they do fine), and the stuff that does come up grows in itty bitty fits and starts.

The lambs are getting bigger, but Icelandics are slower growing than the Columbia/Hamps we had before, so it looks like they aren’t growing at a good pace (even though they are fine).

The knitting projects are coming along, but I spend so little time actually with needles in hand, that there’s not a lot of progress (go figure). I did get a good chunk of knitting time in today – I needed a day of peace and quiet, The Boy needed money, so I paid him to do the jobs around the house I would’ve done otherwise. He was happy, I was happy, knitting was accomplished. Yay.

The chickens are hiding their eggs, so egg production appears to have slowed – which is not, of course, the real problem (there is no way that the number of hens we have laid only 5 eggs in one day) … but where are they hiding them? Haven’t found them yet … I put a bounty on the nest, maybe that’ll encourage more searching among the younger members of the household. :)

Mackenzie’s wounds are healing slowly – but his condition is improving noticeably. He’s on the doggie version of Keflex, which knocked me on my backside the last time I had to take it, and may explain why he is so tired and lethargic (I could barely walk from one end of the house to the other without needing to sit down and rest, and that was after the infection was under control and all I was dealing with were the drug effects). Mac’s wounded skin is looking healthier by the day, though, lethargy aside – I believe the intensive treatment with steroid/antibioitic cream (the first day) followed by calendula/plantain ointment several times a day for the next four days helped get things off on the right track, and all the resting he’s been doing has surely allowed his body to put all effort towards healing. I’m fairly sure the mudbath Mac gave himself on the second day (when he worked up enough gumption to chew through is leash and go walkabout) did not help matters, but he probably thinks that’s the secret to his healing. Hmphm.

Ah, another thundershower has arrived. Thanks for watering the garden, God, I didn’t get to that today. Appreciate the help!

12 June 2010

The best way to grow an amazing crop of hay…

… is to surround part of your pasture with fencing and call it a garden. All the rest of the pasture will have grass 2 cm tall at best, but in the garden, the stuff will be knee high. Mow it down and feed it to your sheep, it’s the best stuff on the acreage.

I’ve been battling the grass in the garden for a long time now (hmm, three years I guess) and it’s still putting up a good fight. Today required the use of the gas powered weed whacker just to find some of the raised beds … yeah, things have gotten out of hand. It comes on so quick … one day it’s ankle high, the next day, it’s shot up into this miniature forest of greenery that hides thistles and assorted things that were left on the ground. The results of the mowing were delivered to the sheep and filled two (yes, two) quad wagon-loads.

At least the sheep were happy.

I had cleared several of the garden beds early this year and planted some ‘head start’ things, during that unseasonably warm spring weather we had a couple months back … but I have come to realize that while the garden plants may appreciate a head start, they absolutely cannot compete with the weeds in those chilly spring temperatures, so if you haven’t got weed-free soil (or the time and knowledge to identify and remove the weed seedlings while not removing the plant seedlings) … give your plants that head start indoors. I couldn’t even find any mullein where I’d planted it … nor the chamomile, poppies, meadowsweet and other herbs. I did find a few beets and a couple of carrots … and the onions and garlic are okay, but for everything else, I ended up just digging the beds up a second time and replanting. Next year, I will hold back from the temptation to start early (or, more likely, start more things indoors). Outside early starts just don’t work, not with this climate/garden combination, anyway. Maybe after the pasture grasses are all gone it’ll be different. You’ll have to come back and ask my grandchildren … it’ll probably take that long for the stuff to finally go away.

However, I did manage to get about half of the garden weeded and cleared of grass, two rows cleared and planted (tomatoes transplanted from inside, and a row of heritage beans, the kind for drying), and more beets, carrots, leeks and radishes put into one fully-cleared raised bed. I found some volunteer mullein plants and transplanted them to where the others were supposed to be, and put in some calendula and poppy seeds. The one small raised bed that had serious grass problems is now host to several zucchini plants: I figure if anything can outcompete the grass, it’s probably a zucchini. :)

Tomorrow – assuming I can still move – I’ll tackle the herb beds, transplant the stuff that is still inside and waiting to go out, and hopefully get the other large raised bed cleared for planting.

Of course I now have no idea where my garden plan is. I’m making it up as I go. :)

09 June 2010

Cheerful tomato plants

Been tired, wrung out and busy of late … so not writing much.

So, here is a cheerful picture of tomato plants to tide you over until I come back with something more profound:

They’ll be moving outside to the garden this weekend, if all goes well!

05 April 2010

More progress in the garden

Ev asked for pictures of the garden, so I had The Boy (who is a great photographer) take a few shots today while I finished raking the wide beds.


This shows the new ‘mini-raised beds’: large tin cans with the tops and bottoms removed, filled with soil and planted with herbs that should be kept from spreading (or clearly identified). I have no idea how well the cans will hold up to the weather, although all of these are enamelled on the inside, so perhaps they’ll be more durable than the usual sort. Trying them out seems a good way to discover the outcome – they were free, after all! (Thanks Mom!)

If you look closely you can see the wooden plant labels – I splurged and picked them up at Lee Valley, having grown tired of cutting up yogurt containers into strips that just get lost in the dirt. The orange thing is a spike waterer: you put a pop bottle on the top and it’ll slowly water a plant (another Lee Valley widget).


And here you see yours truly, decked out in garden gear, raking the wide rows. The straw cowboy hat keeps the sun out of my eyes and off my fair skin, and the rubber boots are lined with sheepskin which makes them both warm and cushioned. The belt is my “Quaker Sword Belt”: it’s a thrift store D-ring belt to which is attached my Japanese hori knife (for weeding), a sheathed dagger (I’m useless with a flip blade, and there’s always bale string that needs cutting if I haven’t got a knife with me), and a net bag containing the house phone, my cell phone, and a family radio (I was on call today, and The Boy was out and about). It’s very handy having all the ‘usual tools’ attached to a belt that can just be added on to whatever I’m already wearing – although I do need to replace the net bag with something smaller … it was what was handy today, but it’s too big to really work well.

Anyway, the white arch is plastic tubing (previously used as row cover supports) which is marking where the rebar row-markers are placed (I discovered that rusted rebar isn’t particularly visible against a dirt-and-straw backdrop, so these are serving as safety markers). The wide rows are measured very scientifically: they are just as wide as I can comfortably step across. I figure I won’t always want to walk around to the end of the rows, so if I can take one big step and get across, that’s about how big it ought to be. The pathways between the rows are about as wide as I am, on the assumption that I won’t be taking a wagon down between these paths, just walking (the raised beds are spaced so that the wagon fits between them, but then, those are rather solid fixtures, and it’s best to have a bit of room to manoeuvre).

There are only 5 rows for the wide beds, which doesn’t seem like it could possibly be enough. However, with the wider rows, there’s room for more plants – it’s not just one long row of tomatoes, they can be staggered so that each still has enough room to breathe, but the total number of plants is almost double what we’d get if we just had one single row.

I’m sure I’ll still find that I need more garden space – as I learn to preserve what we grow, I’ll want more available to put up for winter, plus our summer eating, but for now, it sure feels good to have all that compost spread out, raked mostly smooth, and marked out for planting.

03 April 2010

Finally getting dirty

At long last, it’s time to get good and dirty in the garden!

Yesterday, The Reluctant Farmer fired up the bobcat and brought in about 20 bucket loads of 2-year old compost from where it had been piled to age. The resulting mix of mostly-dirt (the pile wasn’t turned or cared for in any fashion, so there are still some spots where the hay/straw is clearly recognizable) was rather haphazardly spread in the south area of the garden, where the row crops are going to be planted this year.

We follow two wildly different gardening strategies: we use both Square Foot Gardening and Gardening When it Counts. The root vegetables and small things like lettuce go in the square foot beds, and the tall and spreading things, like potatoes, peas, and beans, go in wide rows. Since we have a good, steady supply of soil amendments (barnyard waste is not waste around here!), square foot gardening isn’t as resource intensive for us as it is for people who have to buy their compost at the store; and since we actually do have a lot of room for our garden, we also have the option of wide rows for the kinds of things that do well in that system.

So, needing more raised beds for the herb garden expansion, I got out the air nailer and the skill saw and knocked together several more frames – we have plenty of scrap lumber, and as the garden used to be pasture (and thus is well populated with insanely stubborn grasses), it’s very useful to get the growing areas clearly marked off from the paths. Besides, the actual topsoil layer is very thin, and the borders for the raised beds hold in the upgraded dirt.

The garden plan was up to version “E”, and the actual implementation is, as always, turning out to be different yet again from the last iteration of the plans. It’s not too far off, though, and I’m finding that the work that went into the various drafts is, once again, saving me time in the actual implementation … even if it is different than it was on paper.

So, what’s out there so far?

Well, there is a 4x4 bed of onions planted: I had a bag of onion sets that I picked up last year and never planted, so those went in today (onions don’t mind being planted early). There were a lot of herbs that needed stratification, and so several of those went out today as well – there’s no point fussing with starting them indoors if Mother Nature will take care of the stratification for me. So, in a new 5x2 herb bed we have Meadowsweet (used as an anti-inflammatory and stomach remedy), Evening Primrose (an edible plant that is used for a number of medicinal purposes, including soothing muscle aches), Borage (for skin and women’s concerns), Lovage (a celery substitute that is also good for an upset stomach), Elecampane (for bronchitis and congestive coughs), Vervain (for fevers, and as a relaxing tonic), Coltsfoot (for dry coughs), Hawkweed and Horehound (both for congested lungs and coughs). Most of these I haven’t grown before, so we will have to see how they do.

In a new 3x3 bed we have Chamomile (for tea) and Mullein (for coughs and ear infections), and in another we have Poppies (for seeds) and Calendula (for soothing skin salves, and in tea for upset stomachs).

There’s also space set aside in a second 5x2 bed for the herb seedlings that are still indoors: chicory (for drinking as a coffee-type beverage which is also good for the liver, and as a dye plant), Wild Lettuce (which is a fabulous sedative that gives pleasant dreams and deep, satisfying sleep), Betony (a black tea substitute that also has some medicinal uses), and St John’s Wort (used in depression, but also topically for arthritic pains and as an antiseptic).

Up along the fence, I am trying a new strategy: my mom works at a camp kitchen where they use lots of gallon-sized tin cans. She saves them for me, and I’ve been using them as temporary plant pots for seedlings. Today, though, I took some outside and used the can opener to remove the bottom as well, making a tin can tube. I dug out a section of grass and twisted the can into the dirt, then filled it with good compost and planted seeds in the can. Basically, I made small round raised beds. I have some very old seeds that may or may not still be viable, and some other plants that I want kept separate - those that can cause skin irritation if handled in full sunlight, for instance, or those that I want to be sure nobody picks by mistake. So, in the tin cans I’ve now got dill (for cooking, and as a digestive aid), columbine and sweet peas (flowers from my ancient stash of seeds), two kinds of poppies (which may be seed poppies or may be the California kind, we’ll have to grow them and see), Rue (used as a dye plant, mostly, or very cautiously as a herbal remedy), California bluebells (more flowers), and Feverfew (for migraines and fevers). I also plan to put cilantro, chives and basil in tin beds (all herbs used for cooking), as well as woad (which is a dye plant).

This is most definitely the year of the herb garden: I like learning about the various herbs and their uses, and I have found them to be quite effective, even if my family makes fun of me for using ‘snake oil remedies’. The herbs do have to be used with knowledge and respect, of course – just because it grows outside doesn’t mean it won’t hurt you – but with a reliable herbal guide and careful selection of plants, you can make life a little more comfortable without spending money on ‘over the counter’ remedies. I mean, why take Nytol if a cup of strong wild lettuce tea will knock you out for the night, and let you wake up without a hangover the next day?

Besides, growing stuff just feels good.

Up next: veggies!

16 February 2010

A garden journal

I love my piles of gardening books. I have a wide variety of references, and I mix and match strategies to suit what I’m growing and where. Given our steady supply of composted manure and ready access to waste straw, hay and wool for mulch, we are fortunate to have the full set of gardening strategies available to us – we aren’t reliant on chemical fertilizers to keep our garden beds in good shape, we just add manure every year, and we have plenty of it. It’s taken quite awhile to get the entire garden area ready to come under cultivation, but I think, finally, this year we are there.

I use Mel Bartholemew’s Square Foot Gardening for most of my root vegetables, and I do love planting my carrots and beets in little squares inside the big one foot squares marked off by yarn in my wood-sided raised beds. However, I also follow the advice of Steve Solomon’s Gardening When it Counts, which is pretty much the antithesis of the intensive strategies of the square foot method, for other things. Solomon’s strategies work really well for larger plants like potatoes, corn, and tomatoes, and this year I’ll be attempting the wide short row strategy he recommends for some of my other plants. I also hope to incorporate some of the season extension strategies described by Eliot Coleman in the Four Season Harvest, a lovely gift from Theresa at Pondering the Myriad Things. In addition to these major resources are the books on the medicinal uses of herbs, books on natural plant dyes, and assorted general garden reference books.

Trying to find the information I need among all these amazing resources can be a real challenge sometimes, so I decided to create my very own garden journal, combining all the key points I needed in one spot.

I sat down at the kitchen table with my piles of books and a new, untouched journal (a gift from my wonderful husband a few years back, which I’d been saving for something special: this is it). I also dug up a calendar (this one is the STARS fundraising calendar – The Reluctant Farmer has helped load people into the STARS rescue helicopter more than once in his role as volunteer firefighter), and my stash of seeds.

First, let’s talk about the seed stash. Normally, the seeds live in a lovely binder that The Boy got me from Lee Valley (where else?) that protects the seeds from moisture and keeps them nicely organized. However, come planting time, I need them out where I can quickly rifle through them to get to the ones I am after – so, I took a regular cardboard box, chopped off the lid flaps, and sliced them so that they fit into one another to divide the interior into seed-packet-sized sections. The seeds are sorted into the sections based on when I need to deal with them – the ones that are going to need stratification and indoor starting are in the first sections, those that need to go out early (as soon as the soil can be worked) are up next, and the sensitive ones that need the frost well behind us are at the very back.

This also got me started on the journal itself.

Each plant is listed at the top of a page, which is cross-referenced on a table of contents at the beginning. The herbs are all at the beginning of the journal, vegetables and fruit plants are at the back. All plants have information about where and how they need to be planted, if they need stratification and indoor starting or if they go straight outside, what kind of watering requirements they have, how much sun they want, and so forth. Then, herbs have additional information about their medicinal properties and which parts are harvested, and any plant that is useful as a dye plant has the colours and any instructions for use listed as well. The information is gathered from all the relevant sources – so, if this is a plant I put in square foot blocks, I wrote down the density per block, if it’s one that I plan to follow Solomon’s spacing guidelines, I wrote those in. I make a note in the margin to indicate which book the information came from, so I can go there for more detail if I wish.

The journal still isn’t quite complete, but I have basic information for just about every seed I have in the collection, plus the few I have still coming on order. As time passes, I can update it with specifics about what works well here, in our specific microclimate, which is why it is called the Apple Jack Creek Garden Journal. It’s specific to here. There’s no need for me to write down that carrots can be stored in the ground over the winter if you mulch well with straw … that is true in some places, I am sure, but not here, not by a long shot (even under a layer of straw, the ground is quite thoroughly frozen all winter: you’d be chipping out frozen carrots with a pick-axe if you tried that here). Most of the information about “a second planting for a fall harvest” is not relevant either – our growing season is too short. however, that might change, with climate change and season extension, so I’ll leave some blank space and add to the book as I learn.

The calendar is the piece that is most specific to this year’s plans. The ‘official last frost date’ is marked, as is the date we actually had our last frost last year (which I know because I wrote it on my garden calendar from last year, and it was a whole month after we thought we were in the clear … not a good spring, 2009). Using those dates (and the dates of the full and new moon) I work backwards to figure out when things need to be started indoors, or when we should be planting things outside. Family tradition says you don’t plant outside until the first full moon after the May long weekend, and this year, for the tender plants, I’m extending the target to the first new moon after the first full moon in May – we’ll see how that goes, and if it works, it may be incorporated into the family lore.

As each seed is documented and it’s needs are determined, that information goes onto the calendar. Several of the herbs, for instance, require stratification, some for six weeks, some for four, some for one or two. The calendar makes it easy to determine when I want to have “seed starting day for herbs” – knowing that they take about 2 weeks to poke their heads out of the dirt and need a few weeks indoors to grow and turn into actual plants before being set outside. Given a starting date for seeds, it’s a simple matter to work backwards to list which varieties need to go into the freezer when. I wrote that detail on the seed packets, too, for those that didn’t mention it, as well as making sure it’s in the journal.

The calendar is the best way to track what really happened, which will, of course, help for next year. For instance, I remember that last year that late frost killed a whole lot of things I’d put out too early (all my tomatoes, for instance) although I wasn’t careful about documenting when each thing was planted, and I want to do that this year. I also remember that I had too many seedlings indoors for too long – I started them too early, and they outgrew their little pots before I could get them in the ground – so this year, I’m trying to time things a little better. I do still have the ‘optimistic planting’ dates marked – hey, you can put a few seeds in early, and if they grow, well, awesome, and if not, well, not a huge loss. Same for the started plants – I finally put a few tomato seedlings in dirt yesterday, because I just couldn’t stand the wait any longer, but the bulk of the tomato plants won’t be started for several more weeks.

Planning the garden is a great thing to do in late winter – it makes you feel like spring really is coming, and it saves a lot of headache later on if you take the time to do the research before hand (I now know why a bunch of my herbs didn’t do anything last year – that whole stratification thing matters!)

Maybe a garden journal is just what you need, too.