But the fountain looks nice and there are rocks by the retaining wall and I pulled out a bunch of dead grass and the clematis vines are all growing and I put the water cube by my downspout (though it still needs a connector) and the firewood is all restacked so I can move the pallets and level that area and there's butter made from the cream that was turning and holy crap I need more sedatives in my life.
Living on a small holding in rural Alberta, raising kids and animals, growing stuff, creating things with fibre, and living with PTSD. See more at www.applejackcreek.com.
21 April 2016
17 April 2016
Next Project: McClary Kootenay Range restoration
So I woke up this morning and saw this posted on our local buy & sell page:
Yes, it’s very dirty and rusty … but it’s got potential! And it’s 36”x30”, which will fit in the space where the Bakers Oven is presently located – if the restoration goes well, anyhow. I love that it has a warming cupboard … and aren’t those little flip down shelves just calling out for a teapot?
Plus, I got it for $175.
The inside of the firebox was originally plumbed with pipes for hot water, but the block containing the pipes had cracked … got that out, and there will be a little bit of mending required to patch up the remaining holes, but that’s the only structural issue.
The rest comes down to elbow grease.
It’s actually a lot nicer than it looks at first glance … here are the doors for the warming cupboard, one that’s had a quick scrub and one that’s untouched:
It’s shiny! And the little circle contains a mirror – one is missing, and the other is losing some of it’s silver, but I can get a new one cut at a local glass place, and probably re-silver the other one myself.
I didn’t even realize that the doors and trim were shiny until I started cleaning … I’ll need to pick up a wire wheel for the drill (aka a “whappity thing”) tomorrow so that I can really get the rust off of things, but with just steel wool and some bathroom scrubby stuff I got far enough to have high hopes for the finished stove.
And this is the oven rack – fancy!
I’m quite excited to see how this project turns out … when we were originally getting a wood stove, we looked at these old ones, but most were too wide for the space we have and the reproduction ones are REALLY expensive. We settled on a Baker’s Oven (from Australia) which I really like, but if I can have an actual antique instead? Oh yeah.
Near as I can tell this model is from around 1910 – it’s a McClary Kootenay Range, which was made up until the 1920s, but the later models had more enamelling, so I’m thinking it’s in the older time frame.
This is going to be fun.
Yes, it’s very dirty and rusty … but it’s got potential! And it’s 36”x30”, which will fit in the space where the Bakers Oven is presently located – if the restoration goes well, anyhow. I love that it has a warming cupboard … and aren’t those little flip down shelves just calling out for a teapot?
Plus, I got it for $175.
The inside of the firebox was originally plumbed with pipes for hot water, but the block containing the pipes had cracked … got that out, and there will be a little bit of mending required to patch up the remaining holes, but that’s the only structural issue.
The rest comes down to elbow grease.
It’s actually a lot nicer than it looks at first glance … here are the doors for the warming cupboard, one that’s had a quick scrub and one that’s untouched:
It’s shiny! And the little circle contains a mirror – one is missing, and the other is losing some of it’s silver, but I can get a new one cut at a local glass place, and probably re-silver the other one myself.
I didn’t even realize that the doors and trim were shiny until I started cleaning … I’ll need to pick up a wire wheel for the drill (aka a “whappity thing”) tomorrow so that I can really get the rust off of things, but with just steel wool and some bathroom scrubby stuff I got far enough to have high hopes for the finished stove.
And this is the oven rack – fancy!
Near as I can tell this model is from around 1910 – it’s a McClary Kootenay Range, which was made up until the 1920s, but the later models had more enamelling, so I’m thinking it’s in the older time frame.
This is going to be fun.
16 April 2016
Is this real? Am I awake?
Last night I had strange and frightening dreams that were so real... people in the yard... A trio of mountain cats on the deck, my friend and her son here for the night, my own son trapped under falling scrap wood while a big cat stalked him...
Yeah, not realistic in the light of day, but in the terror of the dream it was all so real.
The worst part was that I dreamed that I woke up... Then more weird things followed.
This meant that when I finally did wake up, I couldn't be sure that I was really awake. I kept yelling "help!" and my husband tried, but how do you help someone trapped in their own head?
I made him go check the house, to be sure the electrical fire I had seen wasn't real... Then I had to go check it myself, and wake my son to convince myself he was OK. I insisted on taking one of The Boy's shoes back to my room so that I could see it and convince myself that I'd really truly seen him and he was home safe. Not sure why I was so fixated on the shoe, but it helped. I sat on the bed, breathing hard, holding his shoe, saying "I'm awake.. I'm awake.."
I was acting so strangely that Ben was scared. He did come lie on my chest after some convincing, and calming him seemed to calm me too. Yay for support animals.
I eventually slept again... More unpleasant dreams but thankfully not the full on trauma nightmares. Oi.
I'm in the midst of a drug dose change, which might explain the timing... But yeow, I don't want to do that again.
Being awake but unsure of reality is terrifying. I have so much more empathy for people who suffer breaks from reality.. I knew I wasn't all there, but anchoring myself was extraordinarily difficult. And I had help.
I'm so tired.
PTSD is real.
08 April 2016
Permaculture inspired landscape : evergreens
Today the Younger Boy and I went over the creek and through the woods and dug up some trees.
We don't have many evergreens, but they've been slowly reproducing back in the area by the creek - which is just left natural, so, zone 5 in permaculture terms. There are some nice little trees back there, many of which are crowded close together so thinning them out a little doesn't seem like a bad thing... And then we get trees for the yard!
We now have the beginnings of a corner of the driveway planting group - which should help with snow drifting across the driveway..
We have trees along the retaining wall / berm / water soaking spot...
As well as a nice tall one over by the shed, and another over by the chicken coop fence.
We added some mossy logs to the retaining wall, in hopes of propagating some additional types of greenery in the shaded part.
I also planted some wheat and flower seeds in the barrel that is around the well - should be about time for them to be planted, and as it's raised and metal, it ought to warm up fairly well.
It's amazing how much difference a few trees makes to the yard... Suddenly, it looks like someone actually paid attention to the layout, instead of just making do. Which, of course, is exactly what happened.
Oh, and there's one extra tree in a pot to go to the Small People's other household, where there is also a shortage of evergreens!
29 March 2016
Permaculture - inspired landscape design: dirt
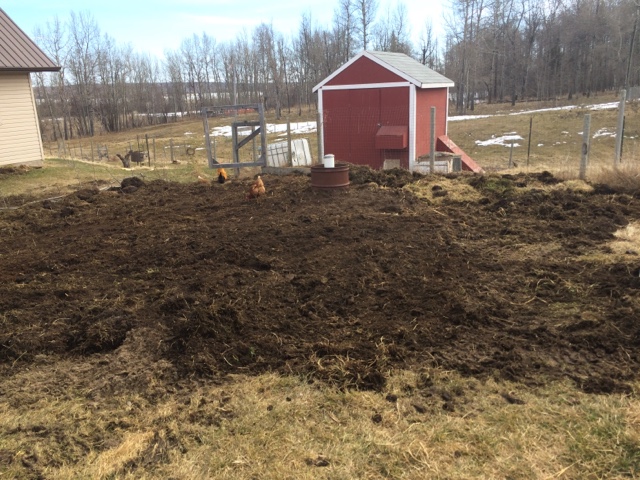
Today things finally had thawed enough to get the skidsteer going.
There's more raking to be done, but what's there needs to settle and thaw the rest of the way. I have another big pile to spread out, and more loads to bring out to other low spots around the house, but that was a good day's work.
The giant windrow of composted barnyard stuff is somewhat mixed... There are bits that are just slimy hay, bits that are gorgeous compost, and bits that are what amounts to quack grass sod.
This means that what you end up with is kinda lumpy.
However, I managed without breaking anything - not even a fence post. (This is actually quite an accomplishment for me, the skidsteer is persnickety and I'm far from an expert.)
Once I had lots of piles of dirt in place, I got the rake and started moving it around. Big chunks got tossed over by the chicken coop fence, where I hope to grow some squash and sunflowers so the lumpiness won't matter. Lots of the partially decomposed stuff went by the retaining wall, where there will be lots of things planted that will appreciate it and help it break down the rest of the way.
The smoothest stuff went in the barrel around the well head - it'll get planted with flowers so it looks like a container, and as a side benefit, the well head itself is much more protected.
It was a lot of work but I'm very pleased.
Oh - I scraped off a bit of "sod" and took a picture of what our soil looks like :
Clay. Just... Clay.
This is why I'm not a vegetarian anymore - there's no way our particular patch of land could grow much beyond pasture grasses... But it grows those well. And then the animals turn the quack grass into this stuff:
21 March 2016
Permaculture - inspired landscape design
I've been reading a lot of permaculture books - lots of emphasis on water management and designing for ease of use and maintenance.
I have decided to do some substantial levelling and terracing this year, as the skidsteer is working again and I have a very big pile of finished compost (five years or more of barnyard waste!) ready to be moved once things warm up. I cleared it all into a long windrow last fall, and the freeze / thaw cycles of the winter should have it nicely broken down by the time I get to it.
We need to improve the drainage near the north wing of the house: too much water settles near the foundation and the sump pump has to work overtime to keep up. I started a bit last fall, but the bigger work is for the summer.
I began with a bit of a retaining wall made of fallen trees and branches and a bit of rebar for stability.
The space above the wall will be backfilled and levelled to make a flat play area, and the berm itself planted with willows and raspberries and whatever else I can get my hands on - a few evergreens (which will have white Christmas lights strung through them, because winter nights are long and those will be visible from the north living room windows), some poplars (no shortage of those), saskatoons (if I can get cuttings to root), cherries (ditto), and apples.
The near side of the berm, which is closer to the house and will be a little shaded and a little soggy, will get hops vines, morning glory, flowers of all sorts, clover, and ornamental grasses and grains. That should stabilize the bank and give us a lovely view as well as be productive food-wise.
There's a spot for a narrow step stone stairway by the chicken coop, and the lowest section will be a drainage path for water to run down towards the pasture - though it'll be caught in several tree planted berms on the way down. Between the hose outlet on the house and the barnyard is a clear not-too-steep ramp, and beyond that will be another cluster of plants along a second berm to help hold up the levelled top part of the yard.
Out in the Northwest corner of the yard are a couple of spots for tree clusters - windbreaks, primarily, as that's where it generally comes from. They will go either side of the gate to the back of the barnyard, so we can get the skidsteer up through there when needed. The rest of the North side needs levelling and then it'll get planted with the nice grass mix we used out front last year. As more trees show up, the north edge of the property, along the road, will get filled in to make a deeper windbreak. At the corner of the driveway, outside Missy's bedroom, we will put in a cluster of evergreens, willows, and a lilac and a cherry tree as per her request. :) That should also help ease the drifting across the end of the driveway, once they get established.
I have some plans for the east side of the house, too - it's where you first come in, and it still looks rather... Construction-ish.
Last year saw the south yard basic landscape work done, this year will be the west yard and major earthworks and levelling... And lots and lots of tree planting. See? Apple and pear seedlings! There's hops vines and more treelings in another pot, too, and a bucket of willow branches soaking in water and slowly forming roots.
I'm very excited about it all.
Unfortunately, I'm going to have to wait a little bit longer... This is what I woke up to today :
I know. It'll melt. But still.
03 March 2016
Upcycled wool sweater
My slippers had holes in the heels.
I had a partially felted itchy wool sweater.
I felted it the rest of the way by washing on hot / cold, then cut out sole pieces.
Mended the heel holes with wool yarn that will felt into a patch with wear, then stitched the sole pieces on with colourful weaving cotton.
Voila. Warm feet.
Subscribe to:
Posts (Atom)