31 August 2013

How much is ‘enough’?

I’ve had a few realizations lately: one big one being that my constant worry over whether or not I have “done enough” is actually a (really ineffective) strategy for seeking safety. See, if I can just do enough, I tell myself, then I nobody will be angry with me, then I can be sure it will be safe. So I push and push and push  myself, trying hard to do as much as I possibly can, and then I exhaust myself, and get resentful and angry and tired, and of course, my attitude annoys everyone who runs into me. And then I say, “See? they are mad! I didn’t do enough! Dammit, I gotta try harder!” It’s one of those self-perpetuating, self-defeating coping strategies that makes perfect sense to a PTSD brain.

Anyway, I’m working on that one.

One of the ways of approaching the issue was to take a good factual look at what I really do each week. I spend a lot of time telling myself I am lazy, that I hardly get a thing done, things are always a mess (that much is true, actually, no matter how hard I try, the housework always leaves a bit to be desired: a combination of a very large house, multiple pets, a farm, and a low-energy-dislikes-housework-in-general cleaning person). But you know, let’s get some hard evidence before we go off making assumptions.

I do have training in the sciences, so I know how to do observations and document what I find. Here is what I discovered:

Monday to Saturday I have chores that show up on a list on my phone: it rotates through different tasks so that everything gets done, for instance, Monday it’s do the north bathroom and the floors in the north wing, Tuesday it’s bathroom and floors in south wing. Plus things like changing sheets (one room one day, another room another day, so it gets spread out), scrubbing down the kitchen properly (white cupboard doors get nasty in very short order), getting hand prints off the walls, that kind of stuff. That work takes about 30 to 40 minutes per day (though it’s gonna go down when my robot gets here! :D).

Then there’s meals: when everyone is here (so half the time) that is taking from 2-4 hours per day! This morning, I got up at 10, had about an hour of housework stuff to do as I was away yesterday and had to catch up, then it was time to make muffins for lunch and get the table set and unload the dishwasher so I could clean up my mess and then eat and then clean up again … and by the time that was all done, it was 12:30. Feeding lunch to all five of us took … an hour and a half. Because of course there was kitchen cleanup in the midst of all that. Dinner today: I went the easy route and did pizza, but again, with all the things I do while it’s in the breadmaker/oven, that was from 4-5:30. When it’s just The Boy and I here (half the time, due to The Reluctant Farmer’s work schedule), it’s considerably less, but still, the 2 hours per day average for meal stuff is probably valid. (It includes me sitting down to eat, as well, but it’s “allocated” time, regardless).

I should do my three pages in my journal every day as well - that takes about half an hour too. My mental health is notably better when I write every day, so this is important to schedule in.

Then chores: in the winter, farm chores are about an hour a day (hopefully less if the new feeders work as I hope), in summer, maybe 15 minutes. But then there is the intermittent outside work, or bigger inside projects, so … call it 30 minutes per day average throughout the year.

So, what’re we at now, 3.5 hours a day? Yeah, approximately. Anywhere from three to five hours per day on just household and farm ‘treading water’. Six days a week, so that’s a minimum of 21 hours. Sundays I still do meal prep and some other things, but I do try to take that day off as much as possible. Since some of the days during the week probably aren’t a full three and a half hours, let’s just say it’s 21 hours per week.

Guess what that amounts to?

That’s a half time job, right there.

I am up and moving by 10 just about every day (I wake up sooner, but I have to lie in bed for awhile and get up slowly, anything else is too hard on my system at this stage of my healing), and we eat around 5-6 pm. So, 10 am - 6 pm is 8 hours: a standard full work day. Three and a half of those hours are allocated to household management and maintenance stuff and mental health maintenance work. That leaves four and a half for other things: working on the shop, weaving, writing, whatever.

And then evenings - when I really do need to be relaxing (right now I’m spending my evenings knitting small things for sale at the craft show in October, which is quite fun - small projects are so rewarding, they get done so fast!).

So what’d I learn from all this?

One, that I’m doing more than I thought I was. Yes, maybe someone else could get all this done faster or more efficiently … but given my current state of health, working fully half time is impressive. Because on top of that half time job I’m also managing Flannelberry Creek, keeping up with my writing, and doing weaving and knitting and dyeing for sale.

So, yay me.

Second, I learned that I have only got about three or four hours in a day that can be allocated to those other jobs of mine - I can arrange it so that I have more time, by planning and having quick and easy meals, for instance, or doing some of the housework a day early, but generally speaking, I shouldn’t try to book more than three hours. Then I’ll have buffer time.

Third, I learned that I can be done by suppertime and know I have, in fact, done a FULL DAY OF WORK and it is okay for me to sit down and rest. This is a big thing for me, as I never feel like I have done enough to justify sitting still and resting. I should do more. I should do more so nobody gets mad.

Right. I am already safe. I did do a good day’s work. I can sit. Right.

Now, I’ll have to see how I handle it when I maintain this pace for a few months: I’m going to keep tracking it for a while and see how things go - my husband says he can tell much sooner than I can when I’m “not coping”, so his information can shorten my feedback cycle. Still, this is a long-range experiment, not a quick “try it for a day or two and see” … more like “live this way for a few months and see”.

But, anyway, it was very educational to actually MONITOR what I was doing for a week. I highly recommend this to anyone else who, like me, feels like they’ve gotten nothing done. :)

You might just surprise yourself!

29 August 2013

A blog post review of The Rookie’s Field Guide

Right here!

Well, not here here, over there, on the Taylor R’s blog, FlakyMomCrafts.

Cool!

If you’ve read the Field Guide and have something to say about it, we are still doing our prize giveaway for book reviews posted anywhere: your blog, Goodreads, the place you purchased the eBook, Ravelry (there is a thread in our forum), even post it here in a comment and we’ll put you in the draw for a prize.

27 August 2013

Life is precious.

An online friend made it through breast cancer treatments and a double mastectomy in the last several months. She had reconstruction and the whole nine yards, and she was doing awesome – she even participated in the cold cap study and managed to keep her hair throughout her chemotherapy!

Then, at her follow up appointment, they found cancer in a lymph node ... and the end story is that it's metastasized throughout her chest and surgery isn’t an option, nor is radiation. Chemo may control it for awhile.

She is younger than I am. Brilliant. Married. Fabulously funny and creative and talented. And this.

I am heartbroken.

I am also chastised. I take the gift of my life for granted so often … her struggle is a reminder that I should not do that any more.

The community of friends (most of whom have never met in person) have banded together in support and we are doing what we can to encourage and share our love.

Life is a precious gift. I promise to do my very best to appreciate it from now on.

26 August 2013

What would you tell your grade 7 self?

Someone I know on Ravelry posted a list of the advice she’d have given to younger self … and it really got me thinking.

My 7th grade self was in some turmoil - I had been in split grade classes all through elementary, and they stopped offering that at grade 6, because although our school went up to grade 8 (we had K-8 and 9-12), the 7s and 8s had classes that were more like junior high, so the split didn't work anymore.

Anyhow, I'd sort of gradually migrated up a year in school - my teachers all knew it and I just worked with the more advanced materials and that was that. But then in grade 6 when there were no more advanced materials there for me, I was horribly bored. The school sent me for a bunch of academic testing and the experts came up with this huge complicated educational plan for me that would have made me into an even stranger person than I ended up becoming by completely eliminating any hope of a normal social life. My parents, bless them, said "just put her in grade 7 and be done with it". My principal and teachers agreed, told the experts to stuff it, and I moved across the hall. It was only weird for a few weeks, I'd been in school with all these kids for years anyway so it was not too bad.

But I was always a bit of a misfit, and this made it harder, despite all the kindness and support I was shown. It was hard to be so different.

So, what would I tell that mixed up girl?

I think I'd tell her ...

Not everyone will like you. You don't like everyone else either, so that's cool: find people who DO like you to hang out with and don't change who you are so others will think you are cool. Cool isn't important: integrity is.

Find some way of creating that nourishes your soul. Reading and learning are awesome, you've got those down pat, now find a way to put something INTO the world that adds to the beauty and wonder of the place. And then do that, regularly.

Don't assume you are not creative. Just because you can't draw recognizable stick people doesn't mean you aren't creative. Find other media, other techniques. You need to create things. You just don't know that yet.

If you can look yourself in the mirror and say "I really did try my best", then you have done ENOUGH. Your best is all you can do. If someone else says you shoulda done more, or better, or tried harder, well, ask your SELF if you tried your hardest. If you didn't, and you really were slacking off, well, then try harder next time. But when's the last time you didn't try your hardest? Yeah, I can't remember either. So don't take their judgment of your capabilities as gospel. Only you live in your mind and body. You know. They don’t.

Never date anyone you don't want to be married to for longer than six months. If at six months you don't already know you want to live with this person for the rest of your life, break up and find someone new. Don't waste your time and theirs: you already know you are destined for partnership and not meant to live alone, so treat the search for a loving and supportive partner as the serious, life-impacting task it is. Don't wait for fate to drop someone in your lap. Date "on purpose", don't just fall head over heels by accident. Well, okay, you're going to fall head over heels by accident - you're wired that way. So try to at least set up the accidents so that you're falling for guys who will at least be reasonable candidates for Life Partner. It stinks to fall in love with someone who is utterly ill suited to you as a partner - no matter how awesome and fun they are to be with. Because the rubber meets the road in the end, and then it really, really hurts. Avoid that by being intentional about your romances.

And you really, truly DO deserve someone who will love you for WHO YOU ARE. Who will not see you as a renovation project, or "good enough until something better comes along". He should be your biggest fan and your honest friend and your fun companion. If he makes you feel crummy about yourself, GET OUT FAST. Dating is a *trial run* for long term partnership: if it's not fun at the start, when everything is new and exciting, what on earth makes you think it's gonna get better if you  just "try harder" and "suck it up a little more"? Ahem. See earlier conversation about "trying harder".

You are very smart: but you haven’t actually learned how to learn. Find a way to develop those skills now, before you hit university and discover that your brain is a tool that you’ve been using in ‘beginner mode’ all these years, and now you have to learn to make it work in the real grownup world, where information does not just magically soak into your brain out of the ambient atmosphere. School – even high school, even International Baccalaureate classes – is not preparing you for the world of self-directed learning, even though you think it is. Stop coasting, find real challenges, and find them now, while you are young.

There’s probably more … but those would be the big ones.

What advice would you give to your younger self?

25 August 2013

Working on your relationship

The phrase “working on your relationship” has always been a bit of a puzzle to me. I mean, what, exactly, does “working on your relationship” look like? Going to counselling? Having date night once a week? Reading the same book and then talking about it afterwards? I’ve never really been clear.

Well, today I think I have found a new way to look at the whole concept.

One of the major issues in this household is keeping up with the housework. It’s hard to keep things clean – it’s a big house (1100 square feet in the south wing, 1300 in the north), and it’s a farm, so dirt comes in on everything (though we leave shoes at the door). Plus we have pets (with muddy feet and shedding fur), we have open windows that blow in dust, we have a wood stove and the concomitant ashes … it’s dusty and the floors are never clean, no matter how hard one might try. I do try, honestly I do, but it’s hard to keep up with it all and I am always budgeting energy and making trade offs. If something has to get left aside, truthfully, it’s probably gonna be the housework. And this annoys The Reluctant Farmer, who has a not at all unreasonable wish to be able to walk barefoot through the house without picking up a bunch of cat fur on his feet.

The Reluctant Farmer recently got paid for some of the work he’s done for Fire Services, and he decided to put some of that money towards “working on our relationship”. See, if there was a way for the housework to be done more easily, then I would have more energy (and therefore be less stressed and less apt to go over the edge into the craziness that takes me sometimes) and he would have less to be annoyed about (and therefore be more content and less stressed by having to bite his tongue, knowing I can only do so much but still wishing things were a bit tidier). This could only be good for our relationship.

So, for the price of a few counselling sessions, he purchased an automated floor cleaning machine. There is a new machine out that is basically a robotic Swiffer, the Braava. If you have fairly clean floors to start with (i.e. you swept up the bread crumbs and dropped pasta bits and just have a couple of days’ of pet hair and dust on the floor) it can, apparently, keep up and keep things clean by dry mopping and damp mopping.

My job would then be reduced to sweeping up the bigger messes (something I already have no trouble doing), doing a full and proper wash “every so often”, and putting a clean cloth on the little robot and sending it off to mop the floors.

Now see, *this* is what working on your relationship looks like: noting the things that give you headaches and taking action to mitigate the circumstances that lead to trouble.

I think I picked a good guy to marry.

Dyeing in the Garden

We had a lovely day at the Pegg Garden today, dyeing yarn and silk scarves with locally sourced materials.

Fourteen people showed up to play with colour and fibre, and we had beautiful sunny weather for our experiments. I had spent the last couple of weeks preparing dye baths: wood chippings and amur cherry and apple tree prunings (helpfully provided by George Pegg Garden staff), grass clippings (provided by The Boy), thistle and tansy (harvested by me from the ditch), and onion skins and frozen flowers (also provided by the Garden).

The frozen flowers were bundled into a silk scarf before everyone arrived and set to steam, then we chatted about dyeing with plants, and got our yarn into the water baths. We got lovely colours from everything this year!

Then we had our lunch, followed by a tour of the garden led by our intrepid County Horticulturalist, who told us about the kinds of plants we can grow here and showed us samples of many of the ones we were using for dyeing growing right there in the Garden.

While we walked, we harvested materials for the silk scarf dyeing, and then everyone made patterns on their silk and rolled it into a sausage for steaming. We didn’t have enough time to get everything thoroughly steamed, but people could take them home and finish the steaming or leave the bundle to sit for a few days or weeks until the colour develops.

(Yes, that’s a baby sleeping on a blanket under the umbrella. She was an adorable little angel, didn’t cry once the whole day!)

Our yarns came out in fabulous shades – I didn’t get enough pictures, but it really did turn out great. I have more dye bath liquids here at home and some fibre I need to dye for a weaving project, so you’ll be seeing samples soon. The amur cherry prunings gave a really lovely reddish gold that I hope to get more of, and the grass clippings gave more colour than I expected, too! A nice rich brownish green.

I have one more silk scarf steaming now, the one I did for a sample today turned out amazingly well and is at the Garden for show and tell for a little while longer.

… here it is!

It was a lot of fun. Flowers that don’t give much colour in a dye bath extracted for wool can still make fabulous prints on silk, and weeds that you have to cut down anyway make awesome dye baths for colouring your plain yarns. And it’s natural, no nasty chemicals involved, the waste products go in the compost heap … what’s not to love?

19 August 2013

Summer in a Jar

I do buy a lot of my produce at the grocery store – it’s just more convenient than the market. I try to buy Canadian wherever possible, and organic when I can. With canned goods, it gets tougher: we use a lot of canned tomatoes and mushrooms, and I worry about the conditions the workers have been subjected to (particularly in the US, though Canadian growers are not always awesome employers for foreign workers either). So, I do what I can … and I can what I can.

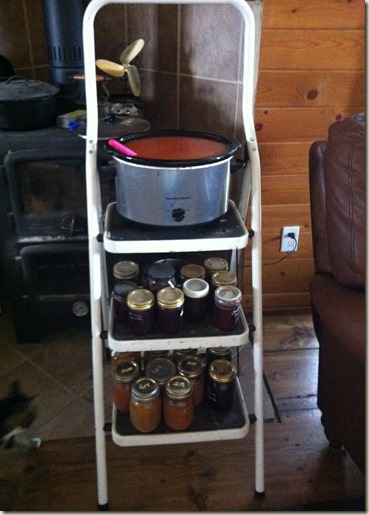
My neighbour dropped off some giant zucchini that had escaped timely harvesting, and at the Fair this weekend there was an extended farmer’s market so I was able to pick up six big bags of tomatoes. Today I have cooked down two of the giant zucchini, some leftover veggies that were in the fridge, and all but two bags of the tomatoes. The resulting ‘thick juice’ gets acidified (for safe canning) and canned in jars – it makes an excellent substitution for a can of crushed tomatoes or tomato juice in soups and stews.

I also got a big bag of sour cherries from a friend, and I made jelly  out of those: I actually boiled up the cherries and strained the juice, then returned the pulp to the pot with a few cut up plums that were in the fridge awaiting some sort of fate, and a big jar of crabapple juice from the pantry, left over from the huge crabapple jelly making spree of a few years back. This meant I got three litres of juice from my gallon bag of cherries, and one whole water bath canner full of jam.

Photo 2013-08-19 3 58 06 PM

The jam and one batch of veggie juice are cooling on the rack, and the crock pot has been filled with the processed juice from several pots of zucchini/tomato/garlic/onion so it can thicken over the next day or so – the crock pot makes a nice gentle but steady heat so it will evaporate down but not scorch. To make the sauce I just cut up the vegetables (I used my awesome mandolin slicer that The Boy got me for Christmas, which made quick-cooking thin slices in no time flat) and cook them with a bit of water to prevent scorching until the whole thing is one big pot of mush. That gets run through the food mill (it needs the medium grate, otherwise too many zucchini seeds make it through), and the resulting juice is either canned as it is (well, with the addition of lemon juice and/or cider vinegar to assure acidity) or put in the slow cooker to thicken, and then canned.

Ta da.

Local tomatoes (and zucchini), and local jelly, eco-friendly and as ethical as I can get it.

18 August 2013

Fair Weekend 2014

We are home from the Fair!

Tired, of course, but we had fun.

I help out at the Bench Show, taking notes for one of the judges and stapling ribbons on the tags and so forth. I helped the Handcrafts judge this year, which I probably shouldn’t do as I have things in those categories, but she didn’t know which things were mine as the tags are all folded up, and I really wanted to hear what she had to say about everything!

There weren’t very many entries this year in the fibre arts categories – local spinners and knitters, join in the fun! A ribbon is nearly guaranteed, and it’s really cool to do. You even get prize money!

Here’s my collection from this year:

The Creamsicle Coat had to be entered in the ‘any hand crafted item’ category, which this year only had one other entry – a lovely wicker basket. It’s so hard to judge apples and oranges that way, but the judge did put first on the coat and she said she liked the use of buttons – there are four different buttons but they do all coordinate. The pink shawl is made with yarn my friend dyed with natural dyes, in the Prism Polygon shawl pattern. I had a few loose strands that should’ve been better woven in, but this was a last minute “oh heavens, what can I enter in this category?” entry so for it to have even gotten a ribbon was exciting for me. The ecodyed scarf took first in the natural dye category, I think mostly because it was so different (the other two were yarns, both very nicely done and the judge had a hard time choosing how to place the whole cateogry – in fact, she left it for last and came back to it, it was that difficult). She liked the subtle colours on the fabric, as do I (this is one of the amur cherry and common ninebark scarves). The merino/silk yarn was up against my friends’ Shetland, which she had done a lovely job of very fine spinning … again the judge had a hard time choosing, but she liked the poofy woolen spun and went with that in the end. The socks took second to my friend’s STUNNING handspun, hand knit shawl – but the judge did comment that the knitting was very even and that it was a good use of Corriedale fibre!

The kids didn’t have as many entries this year, but they came home with ribbons too (including a first place ribbon for the eggs that The Smaller Boy selected and entered, and a second place for the Princess Girl’s chocolate chip cookies). The Boy was busy volunteering and is, in fact, still at the fairgrounds, helping with cleanup.

The Reluctant Farmer was out today with the fire crews, demonstrating how to use a fire hose and putting up the giant sprinkler, which is a huge hit with the kids on a day as warm as today:

Some of the kids were too sandy (from digging in the pile of sand mixed with money that is dumped on the fairgrounds every year by one of the local construction companies, it’s called the Money Pit and it’s great entertainment for the kids) and asked to be hosed down:

So yep, we’re tired, we’ve had a lot of sunshine, and we are, as ever, grateful to all the people who make the Fair possible.

16 August 2013

Sunny Dee: a new shawl pattern available

A little while ago, there was talk in one of my favourite Ravelry groups of the ongoing projects some of us had on the needles that were destined to be gifted to other people. One of the knitters had a whole bunch of things on the go, and said “I wish someone would knit for me!

Well, I was in the I-need-to-rest kind of place that day, plus I had the sense that there was a new design burbling somewhere in my head that needed to come out. I decided I would be the one to knit for her: I would design and knit a new shawl, and send it off to my knitterly friend.

And, that’s just what I did.

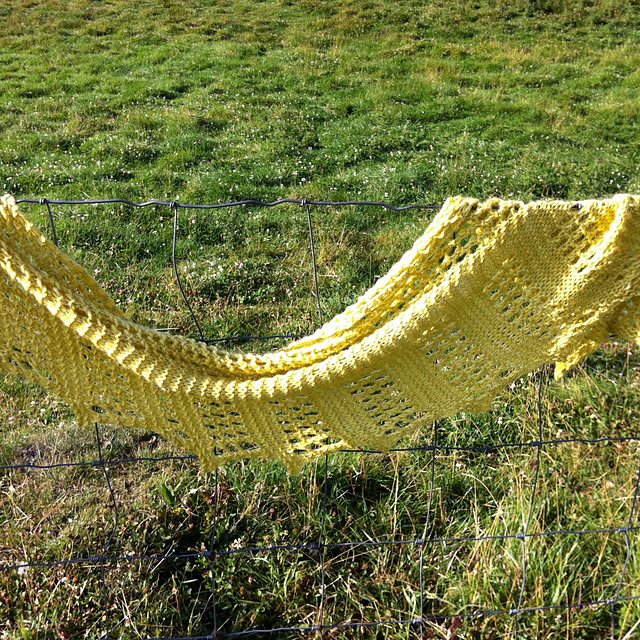
I looked through some pattern books, found a bit of inspiration, and sat down with paper and pencil and needles and yarn and started knitting. I had to restart a few times, as is inevitable when designing, but in the end I came up with a shawl that would knit up quickly in bulky yarn (I finished the prototype that very day), but would also work in finer yarns. As it is a tip-to-tip design, as long as you can divide your pile of yarn in half and the pile is about 200 grams to start with, you’ll end up with something workable.

The shawl is based on garter stitch and the ‘lace’ is just a matter of paired yarn over/knit two together stitches, so it is not complicated at all. The top of the shawl forms a slowly increasing (then decreasing) triangle – you can make it a shallow triangle by working increases/decreases every other right side row, or a more traditionally shaped triangle shawl by working the increases on every right side row. The border is really wide, but a very easy to memorize pattern repeat that forms small points at the bottom edge.

(Yes, those are sheep in the background.)

It’s been made in fine mohair, which creates a beautifully haloed fabric (worn by the knitter’s granddaughter as “her princess cape”), in bulky, super bulky, and worsted weight. All of them look great – hopefully the knitters will add their projects to Ravelry so that you can see them.

The pattern is available now – you can see it on Ravelry or just …

Happy knitting!

15 August 2013

Another week for George, and a new sheep feeder

George the calf has has his two summers and a winter, and it’s time for his ride to the last stop before the Big Pasture in the Sky. However, he was originally scheduled to go last Friday … but there was a snag at the butcher’s and they needed to rebook to this Friday … and then today when we went to hook up the trailer to the borrowed truck, we found that the hitch ball was the wrong size (and very firmly stuck in place). So, we just rebooked for next Friday when the Cruiser will be home, which we know for sure has the right hitch. George can mow the pasture grass for one more week.

So, instead of heading to the butcher I built a sheep feeder. I’d been doing some research on different feeder shapes, again. The one we’ve been using wasn’t bad: it’s essentially a piece of hog panel stapled to the fence posts with a piece of plywood tied to the back on an angle, making a sort of V shaped trough into which the hay is pitched twice a day. The only problem with that set up is that the bigger sheep climb up on the panels and reach over to eat, which is hard on the panels and sometimes pulls the staples out, and the smaller ones stick their heads right through the squares on the panels and occasionally (or frequently, depending how stupid the particular sheep is) get stuck there. Yanking them out several times a day gets old fast (but they STILL put their heads through).

I was also hoping to find something that could hold a little bit more at one shot, so that I can maybe get down to one feeding per day instead of two. I settled on something like the Premier fenceline feeder, as I think the angled base will help the hay settle to where it’s easily accessible, and with higher sides, I can get it pretty full.

I built a small one in the ‘sleeping pen’ today as a test run, and it worked out pretty well. It wasn’t even all that difficult.

Photo 2013-08-15 3 41 05 PM

The Boy assisted by cutting a hog panel in half the long way, with the side with the smaller openings being reserved for the base of the feeder (the other piece is actually attached underneath, to serve as a fence and prevent anyone from escaping under the feeder).

The front and back are made from fence boards screwed into fence posts: the back posts were already there, they were part of the original fence, and the front two posts were added today and not pounded in as deep so that the front of the feeder is high enough that the sheep can’t climb up on it (or jump over it).

Two thicker boards (2x4s, well, I think one is a 2x6, but whatever, it’s the 2 that matters) are screwed to the inside of the posts, the front board higher than the back, and the cut hog panel piece laid on them. Fencing staples are hammered over the wires of the panel to hold it to the boards, and then thinner boards are screwed to the inside of the fence posts going up the front and back of the feeder, creating a big trough. I left gaps between the boards to allow air circulation, save on lumber, and let me see how full the feeder is without having to go outside and peer down into it.

Here is a sheep’s eye view:

Photo 2013-08-15 3 41 25 PM

I can probably lower the whole thing a little bit, most of our sheep are pretty short. I’m also going to cut the hog panel one more ‘square’ up from the bottom on the next one, making the angled base a little bigger in area.

The hay is going to fall through and collect on the ground under the feeder, but the sheep will eat that stuff too – they do quite well eating off the ground, actually, if they don’t end up lying in it. We’ll see how these go – the plans actually call for a tray underneath to catch the hay as it falls through, so that’d be another option (I figured the ground made a perfectly acceptable tray … we’ll see).

This is a small one and won’t hold very much hay at one shot – hopefully if I extend the bases on the long row of feeders I have yet to build, I can widen the whole assembly a little and get a bit more in at one time.

It’s really hot out today, but it was good to get this done. I’ve wanted to have a feeder next to the sleep shelter for some time now, because we can use that area as a catch pen (with a little creative fencing, which is on the list of things to do before winter as well). If you fill that feeder, everyone will run into the pen and then you just slam the gate before they figure out that you are trying to catch them in there. Sheep are very easily bribed with food.

Okay, that’s enough hard work for one day … I’m going to go rest now!

11 August 2013

Frazzlehead’s Handspun Sock Recipe

I spun up three 100 gram Frazzlebatts.
I plyed them together and made two big balls of 3 ply yarn. Sparkly, purple and red and blue yarn. Thick yarn that wanted to be boot socks.
I experimented with needle sizes. I experimented with toe shapes. I experimented with patterns and leg shaping and in the end, I made knee high socks.

Then I thought, I should write that pattern down so that next time I want to make socks out of handspun, I don’t have to do so much experimenting. And I should share it, in case other people want to make socks out of their handspun yarn too – a recipe for figuring out how to make socks with a bit of trial and not too much error.
Quote from the start of the pattern:
So you got a lovely batt and spun it up. Maybe you got two or three. You have this pile of lovely yarn and it really wants to be something awesome, but … what does it want to be?
Perhaps what it wants to be is a pair of socks.
Well, sure, you say, but did I make “sock yarn”? What if my yarn is thicker than the usual stuff you get for socks? What if I’m not sure I have enough for socks? Will I run out partway through the second sock? How do I know how many stitches to cast on when I’m using non-standard yarn?
Fear not, brave knitter, Frazzlehead’s Handspun Sock Recipe addresses all these problems.
It’s free. It’s here. Help yourself! :)

04 August 2013

What does this wrung out jittery feeling *mean*?

I have that wrung out jittery feeling again. It’s a combination of tiredness and restlessness all at once, which makes it terribly confusing to decode. Does this mean I ought to rest, because I’m tired? Or that I ought to go do something physical, like maybe work on that fence that is falling over, to work off the restlessness?

I have no idea. I’m trying so hard to learn how to listen to my body’s messages, but seriously, is this "sit your butt down" or "get a move on, girl"?

Can’t tell.

So, I figured I'd let chance help me out: odds, I work; evens, I rest. And the random.org dice roller says ...

Knitting it is. :)

02 August 2013

Canadian Ecoprinting: leaf print success

We have leaf prints!

AmurCherryOnSilkRinsedWithTea

Those are amur cherry leaves.

CommonNinebarkAndMountainAshOnSilkRinsedWithTea

The really intriguing orangey yellow splotch is from a plant called Common Ninebark, which is one of the rose family (so I figured it might make a neat print – which it did). The parts of the plant I used had little flower blossoms on them, and they made fascinating colours!

Below that you can see a mountain ash (rowan) leaf.

So, technique: I put a bit of water in the sink and dropped in two used (very used) tea bags. I swished that around for a bit, took the tea bags out, and soaked the silk scarf for a few minutes. (Tannins help with mordanting, see.) The silk wasn’t pure white anymore, but it wasn’t very much stained by the tea as it had been very weak.

Then I laid out the damp silk and laid my plant leaves on the silk. I covered each section with watercolour paper, as I had read you could get imprints on the paper as well (which I did, see below). Then I layered plastic bags over the paper (some of which had writing on them, which was a mistake, as I have the words “Amur Cherry” imprinted in a sadly obvious spot on the scarf, I’ll have to cut that off), and folded the scarf into a rectangle. This was then steamed over a pot (cookie cooling rack over pot of boiling water, silk package laid on top of that and covered with an upended bowl) for a little bit, then put into a plastic bag sandwiched between two layers of bath towel and squashed under a heavy crock for three days.

I kept peeking, and when I could see that there were prints showing on the silk, I took it out. Amazing! The prints actually darken a little as the silk dries, and I’ll set them with the iron once it’s had a chance to dry completely.

The marks on the paper were also really interesting:

LeafPrintsOnWatercolourPaper

What I wanted most of all was for the layers of silk to be separated from one another, so that I could see the leaf shapes. This wouldn’t work really well if I rolled it into a sausage, because the layers would all smush into each other, so I thought folding it around a resist made the most sense – and why not use a resist that would make interesting prints on it’s own while I was at it?

I also used the frozen rose petals to make some dye: the dye bath came out brilliantly purple, but the resulting dye on the silk was that colour everyone calls “dusty rose” – a very pale almost tea-like shade with just a hint of pinkness to it. On the positive side, the dyebath and the silk smelled fabulous, a huge improvement over dock, which has a really weird mutant pickle smell to it once it gets wet and soggy.

I took the leftover rose petals from making the dyebath and pressed them between two small pieces of watercolour paper, steamed them briefly, and set them under the crock for a few days too. The paper smells just lovely and has some interesting swirly, watery prints on it. I’m curious to see what it looks like once it dries.

Encouraged by the leaf printing success, I took the rose dyed silk out of its dyebath and layered it with poplar, wild rose, and saskatoon leaves, since those are the plants I have in abundance around here. It’s been folded around plastic resists (no watercolour paper this time, and no ink on the bags) and is being squashed by the crock. I think the two step process should be very interesting – I actually don’t recall if I tea-dunked that one as well, but I think I did.

I also made a dyebath out of some frozen blue flowers, and we did get a lovely blue solution, but the yarn I stuck in it didn’t change colour – though the dyebath did exhaust. Or maybe the colour just faded out of the water, I don’t know. I didn’t have many flowers to start with so perhaps that’s part of the issue.

Anyway, we are making headway with the ecoprinting experiments … I can’t wait to do some more!

There is still room in the workshop at the Pegg Garden on August 25 … more info here!